


5
TROUBLESHOOTING
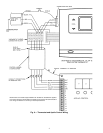
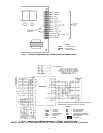
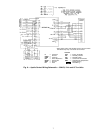
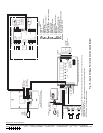
See Fig. 7-10 for Apollo factory, control, and system wiring.
Blank Display or Blinking Display at the
Thermostat
1. Check to ensure there is at least 20.5 vac across the 2 termi-
nals labelled 24 vac. If there is not at least 20.5 vac, check
the unit transformer which is powering the Apollo control.
2. If an ac voltage between 20.5 and 30 vac is read, check for
10 vdc between the terminals labelled WHT and RED. If
there is 0 vdc between the terminals, replace the Apollo
control. If a value between 1 and 10 vdc is read, check the
wiring between the thermostat and the Apollo control.
3. If the thermostat display is blinking on and off, this is an
indication that there is a communication problem be-
tween the thermostat and the Apollo control. The thermo-
stat and the Apollo control communicate on the blue and
yellow wires. If either one is shorted, open, or crossed, it
will cause the thermostat display to blink.
To check the wiring between the thermostat and the Apollo
control:
1. Remove the thermostat and connector board.
2. Wire the connector board to the Apollo control with a
short piece of field-supplied 5-conductor cable.
3. Plug the thermostat into the connector board.
a. If thermostat powers up, there is a wiring problem.
Find the open or shorted wire, or replace the wiring
between the thermostat and the Apollo control.
b. If the thermostat does not power up, try another
thermostat. If the new thermostat powers up,
replace the off thermostat. If the new thermostat
will not power up, replace the Apollo control.
The Control Will Not Energize Heating
1. The thermostat is not displaying the heat indicator:
a. Check the heating lockout temperature set point
and options to make sure the outdoor-air tempera-
ture is locking out Heating mode.
b. Ensure that a sensor in the system is not reading
above the heating high limit temperature. If a sup-
ply air sensor or a direct expansion (DX) coil sen-
sor is not connected to the Apollo control, turn off
the High and Low Limits option at the thermostat.
c. Check the Heat switch and make sure it is in the
AUTO. position.
2. The thermostat is displaying the heat indicator.
a. Check to see if the H1 LED (light-emitting diode)
is lit on the Apollo control. If it is not, replace the
Apollo control. If the H1 LED is lit on the Apollo
control, check the voltage across the H1 relay con-
tact. If it reads 24 vac, replace the Apollo control.
If it reads 0 to 2 vac, check the H1 contactor and
the unit transformer.
The Control Will Not Energize Second Stage
Heating
1. The thermostat is not displaying the second stage indica-
tor. A decimal point on the thermostat display screen is the
indication that the thermostat is asking for second stage.
a. Check to see if the space demand is equal to or
greater than 2° F. The control must see a 2° F
demand before it will call for second stage.
b. Check the Temperature Trend Staging option. If
this option is configured to “on” and space condi-
tions are improving, the control will not energize
the second stage.
2. The thermostat is displaying the decimal point.
a. Check to see if the H2 LED is lit on the Apollo
control. If it is not lit, replace the Apollo control.
b. The LED is lit, but second stage is not energized.
Check the voltage across the H2 relay contact. If it
reads 24 vac, replace the relay board. If it reads 0 to
2 vac, check the H2 contactor and the unit transformer.
The Control Will Not Energize Cooling
1. The thermostat is not displaying the cool indicator.
a. Check the cooling lockout temperature set point
and options to make sure the outdoor-air tempera-
ture is not locking out Cooling mode.
b. Ensure that a sensor in the system is not reading
below the cooling low limit temperature. If a sup-
ply air sensor or a direct expansion (DX) coil sen-
sor is not connected to the relay pack, turn off High
and Low Limits at the thermostat.
c. Check the Cool switch and make sure it is in the
AUTO. position.
2. The thermostat is displaying the cool indicator.
a. Check to see if the C1 LED is lit on the Apollo con-
trol. If it is not, replace the Apollo control. If the C1
LED is lit on the Apollo control, check the voltage
across the C1 relay contact. If it reads 24 vac, replace
the Apollo control. If it reads 0 to 2 vac, check the C1
contactor and the unit transformer.
The Control Will Not Energize Second Stage
Cooling
1. The thermostat is not displaying the second stage indica-
tor. A decimal point on the thermostat display screen is the
indication that the thermostat is asking for second stage.
a. Check to see if the space demand is equal to or
greater than 2° F. The control must see a 2° F
demand before it will call for second stage.
b. Check the Temperature Trend Staging option. If
this option is configured to “on” and space condi-
tions are improving, the control will not energize
the second stage.
2. The thermostat is displaying the decimal point.
a. Check to see if the C2 LED is lit on the Apollo
control. If it is not lit, replace the Apollo control.
b. The LED is lit, but second stage is not energized.
Check the voltage across the C2 relay contact. If it
reads 24 vac, replace the relay board. If it reads 0
to 2 vac, check the C2 contactor and the unit
transformer.
The Control Will Not Energize The Fan
1. The fan indicator is not lit on the thermostat.
a. The Fan switch is in the AUTO. position and the
control is not in a mode (HEAT or COOL
position).
b. The fan switch is in the ON position but the ther-
mostat is in setback and has no mode.
c. The thermostat has just received power or has just
reset and is going through its initialization process.
2. The fan indicator is lit on the thermostat.
a. Check the fan LED on the Apollo control. If it is
not lit, replace the Apollo control.
b. If the fan LED is lit, check the voltage across the
fan relay contact. If it reads 24-vac, replace the
relay board. If it reads 0 to 2 vac, check the fan
contactor and the unit transformer.