5
To Select:
1. Enter configuration mode (if not already there).
2. Use up and down buttons to display Option 21. The SET
icon should be off.
3. Press MODE button once. The SET icon will come on. The
display now shows Option 21 setting.
4. Use up and down buttons to move between available
Option 21 choices of ON or OF. Factory default is OF.
5. Press M ODE button again to return to Option 21. The SET
icon will now be off.
6. Use up and down buttons to select another Option, or press
FAN button to exit configuration mode.
Installer Test Mode
Installer test will be initiated by pressing the fan button for 20
seconds (15 seconds will enter installer setup) “InS” will appear on
the screen and the SERVICE i con will be illuminated.
In installer test mode, pressing the MODE button will change the
system operating mode. Note that AUTO mode is not available in
installer test. Heating and cooling modes must be tested
independently.
1. If the mode is set to HEAT, the first stage of heating will be
energized for three minutes (180 seconds), and then the first
and second stages (if a second stage exists) will turn on for
an additional three minutes. Installer test will always attempt
to run a second stage output whether it is attached or not,
providing a minimum of 6 minutes of first stage operation.
At the end of the 6 minute period, the MODE will return to
OFF.
2. Pressing the FAN button while the heating or cooling
equipment is not running will turn on the FAN relay and
display the FAN icon.
3. If the mode is set to COOL, the first stage of cooling turns
on for three, then first and second stages (if a second stage
exists) will turn on for three minutes.
4. If the mode is set to EHEAT, auxiliary heat turns on for
three minutes, then the mode returns to OFF.
Terminating Installer Test
After 15 minutes of inactivity (no button presses by the installer),
thermostat will automatically revert to normal operation. Pressing
RESET FILTER any time during installer test will terminate
installer test and return the thermostat to normal operation.
Step 5 -- Check Thermostat Operation
Fan Operation
1. Press FAN button, starting continuous fan operation. FAN
icon turns on.
2. Press FAN button again, stopping fan operation. FAN icon
turns off. (Some fan coils have 90 second fan off delay, so
fan may not stop immediately.)
Checklist
1. Run equipment through several heating and cooling cycles
to ensure proper operation.
2. If equipment is to be left in operation, setpoint and
operating mode must be properly selected.
3. Put away tools and instruments, and clean up debris.
4. Review Homeowner’s Guide with owner.
5. Leave literature packet with owner.
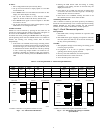
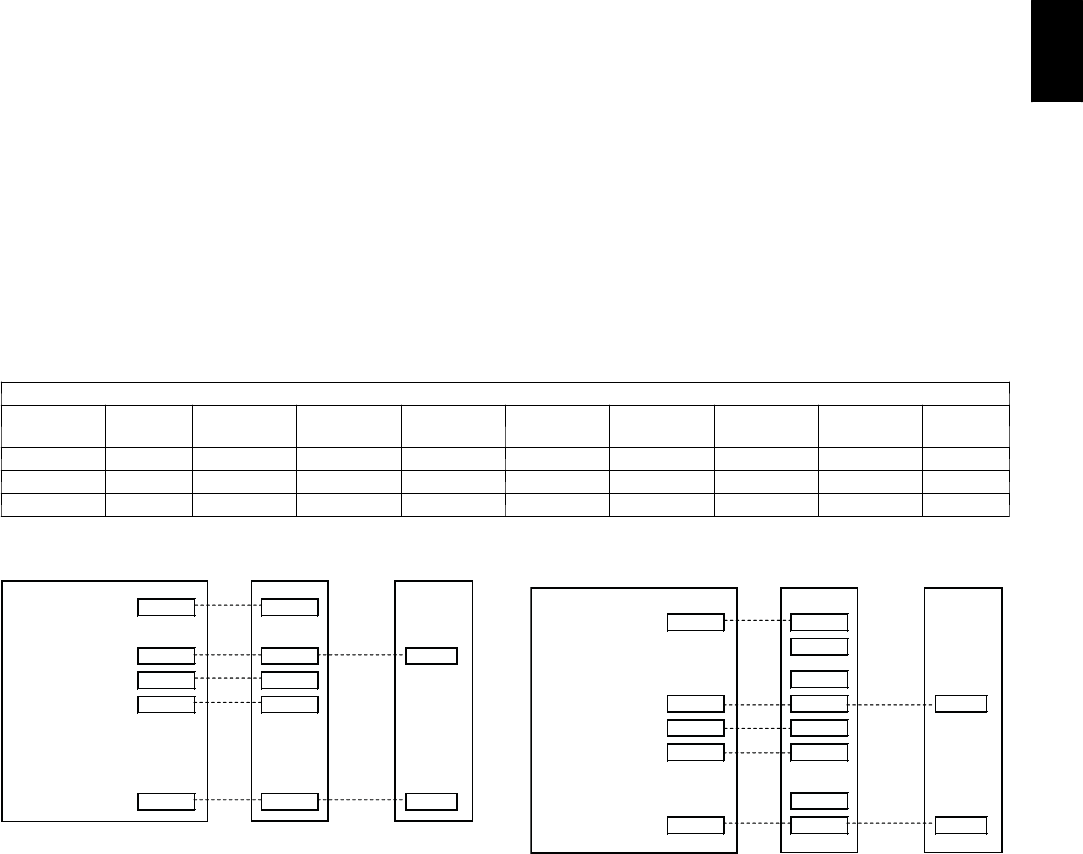
Table 2 – Non--Programmable --C Thermostat Quick Reference
THERMOSTAT OUTPUT
TSTAT
Model
Outdoor
Unit
Option
5
24V
Hot
Common Fan
Heat
Stage 1
Heat
Stage 2
Cool
Stage 1
Reversing
Valve
TCSNAC01 AC N/A R C G W N/A Y N/A
TCSNHP01 HP OFF R C G Y W Y O/B
TCSNHP01 AC ON R C G W O/B Y N/A
Thermostat Furnace Air Conditione
r
Heat
WW
Cool
YY Y
Fan
GG
24VAC
RR
*Common
CC C
A08161
*Common connection not required if batteries are used.
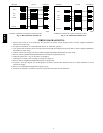
Fig. 1 -- A/C Thermostat with Furnace
Thermostat Furnace Air Conditione
r
Heat
WW1
W2
Y1
Cool
YY/Y2 Y
Fan
GG
24VAC
RR
HUM
Common
CC C
*
A08162
*Common connection not required if batteries are used.
Fig. 2 -- A/C Thermostat with 2--Stage or Variable
Speed Furnace
TCSN


