


6
TO LIGHT UNIT (UNITS WITH
COMFORTLINK™ CONTROL)
(CONTINUED)
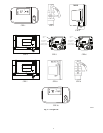
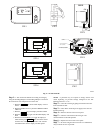
See Fig. 1 for location of gas valve. Refer to Fig. 3 while
proceeding with the following steps.
Step 1 — Turn off the unit demand for cooling or heating by
using the Scrolling Marquee. The Scrolling Marquee is located in
the control box at the compressor end of the unit.
a. Push the
ESC
A
PE
key until a blank display screen is
shown.
b. Push the DOWN arrow key until the SERVICE TEST
LED is lit.
c. Push the
ENTER
key. The display will show TEST.
d. Push the
ENTER
key again. The NO/YES display will
flash.
e. Push the UP or DOWN key to toggle the display to
YES and then push
ENTER
. The unit will be locked
off from heat, cooling or any operation. The controls
will still function and the display will still operate.
NOTE: A password may be required to change Service Test
values depending on previous settings configured in the unit.
Default password is “1111.”
Step 2 — Close the external gas pipings manual shut off valve
located outside the unit.
Step 3 — Turn off the electrical supply to the unit and
install lockout tag.
Step 4 — Remove the heat section access panel.
Step 5 — Turn the Off/On selector switch on the gas valve to
the OFF position and wait 5 minutes.
Step 6 — Move the Off/On selector switch on the gas valve to
the ON position.
Step 7 — Replace the heat section access panel.
Step 8 — Remove lockout tag and turn on the electrical supply
to unit.
NOTE: Normal operation will automatically begin. Service Test
mode will automatically end (exit) after a recycle of power.
Step 9 — Open the external gas pipings manual shut off valve
located outside the unit.
Step 10 — Using the Scrolling Marquee, enable the unit to run
using the following procedure:
a. Push the
ESC
A
PE
key until a blank display screen is
shown.
b. Push the DOWN key until the SERVICE TEST LED is
lit.
c. Push the
ENTER
key. The display will show TEST.
d. Push the
ENTER
key again. The NO/YES display will
flash.
e. Push the UP or DOWN key to toggle the display to NO
and then push
ENTER
. The unit will return to normal
operation and exit SERVICE TEST mode.
Step 11 — To test the operation of the gas section, use the
Scrolling Marquee test routine to energize the gas outputs and to
turn on the gas.
Step 12 — For normal operation, make sure that the set points
are at the normal heat set points.
FIRE, EXPLOSION HAZARD
Failure to follow this warning could result in personal injury,
death, and/or property damage.
If the main burners fail to light, or the blower fails to come on,
shut down gas heating section and call your dealer for service.
!
WARNING
TO SHUT UNIT OFF
(UNITS WITH THERMOSTAT CONTROL)
FIRE HAZARD
Failure to follow this warning could result in personal injury,
death, and/or property damage.
Do not turn off the electrical power to unit without first turning
off the gas supply. Should the gas supply fail to shut off or if
overheating occurs, shut off gas valve to the unit before
shutting off the electrical supply. Make sure to apply lockout
tags.
!
WARNING
See Fig. 1 for location of gas valve. Refer to Fig. 4 while
proceeding with the following steps.
Step 1 — Set room thermostat to lowest temperature setting and
set SYSTEM switch to OFF position.
Step 2 — Close the external gas pipings manual shut off valve
located outside the unit.
Step 3 — Turn off the electrical power supply to the unit and
install lockout tag.
Step 4 — Remove the heat section access panel.
Step 5 — Turn the control dial on the main gas valve
counterclockwise to the OFF position.
Step 6 — Replace the heat section access panel.
Step 7 — If unit is being shut down because of a malfunction,
call your dealer as soon as possible.
If unit is being shut down because the heating season has ended,
restore electrical power to the unit to ensure operation of the
cooling system during the cooling season.
TO SHUT UNIT OFF
(UNITS WITH COMFORTLINK™
CONTROL)
FIRE HAZARD
Failure to follow this warning could result in personal injury,
death, and/or property damage.
Do not turn off the electrical power to unit without first turning
off the gas supply. Should the gas supply fail to shut off or if
overheating occurs, shut off gas valve to the unit before
shutting off the electrical supply. Make sure to apply lockout
tags.
!
WARNING
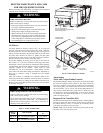
See Fig. 1 for location of gas valve. Refer to Fig. 5 while
proceeding with the following steps.