


Step 2 — Install Piping
Shut off all power to the unit, then lock out and safety-
tag all disconnects before proceeding with installation.
Remove refrigerant charge from circuits using an ap-
proved refrigerant recovery device before proceedingwith
installation.
NOTE: The units have 2 circuits. Perform all of the follow-
ing piping installation procedures on both A and B circuits.
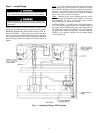
REMOVE MINIMUM LOAD PORT PLUGS AND IN-
STALL FITTINGS — Plugs must be removed from these
ports and replaced with Swagelok fittings. Note that plugs
were factory-installed with Loctite refrigerant-compatible
sealant. Fittings should be installed with similar sealant on
threads.
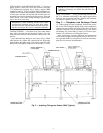
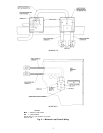
30GX — Cut plug end off of minimum load port braze nipple
on discharge line, located between oil separator and con-
denser. Remove plug from minimum load port on cooler shell.
See Fig. 1. Using thread sealant, install Swagelok fitting in
minimum load port on cooler. Port on nipple in discharge
line is reserved for a brazed connection.
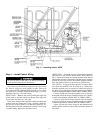
30HX — Remove plugs from minimum load ports on the
cooler shell and the condenser shell (30HXC) or oil sepa-
rator (30HXA). See Fig. 2. Using thread sealant, install
Swagelok fittings in minimum load ports.
INSTALL PIPING — On 30GX units, install field-supplied
5
⁄
8
-in. OD copper tubing between the Swagelok fitting on
the cooler shell and the brazed nipple on the discharge line.
On 30HX units, install field-supplied
5
⁄
8
-in. OD copper tub-
ing between the fittings on the cooler shell and condenser
(30HXC) or oil separator (30HXA). Do not tighten fittings
or braze tubing yet.
TOP VIEW
Fig. 1 — Installing Fittings, 30GX (Typical)
2