


Operation
&
Maintenance
Warranty
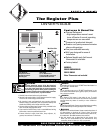
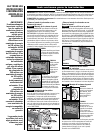
How to operate your heater
1. Once installation is complete and power has been restored, turn the
thermostat knob fully clockwise.
2. When the room reaches your comfort level, turn the thermostat knob
counterclockwise until the heater turns off. The heater will automatically
cycle around this preset temperature.
3. To reduce the room temperature, turn the knob counterclockwise.
To increase the room temperature, turn the knob clockwise.
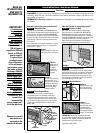
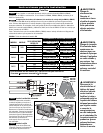
Maintenance As needed, or every six months, minimum.
1. WARNING! Before removing grill, turn the electrical power off at the
electrical panel board (circuit breaker or fuse box). Lock or tag the panel
board door to prevent someone from accidentally turning the power
on while you are working on the heater. Failure to do so could result
in serious electrical shock, burns, or possible death.
2. It is important that you verify power has been turned off and no power is going
to the heater before proceeding. Circuit breakers are often not marked correctly
and turning the wrong breaker off could mean electricity is flowing to the heater,
even if the heater does not appear to be working. If you are uncomfortable
working with electrical appliances, unable to follow these guidelines,
or do not have the necessary equipment, consult a qualified electrician.
3. Once you verify the power has been turned off correctly, proceed to the
next step.
4. Remove screws and take off grill.
5. Wash grill with hot soapy water and dry immediately.
6. While holding blower wheel (to avoid damage or bending), use a hair
dryer or vacuum on blow cycle to blow debris through the element
(Do not touch element).
7. Vacuum blower area without touching the elements.
8. Replace grill and secure with screws.
9. Turn thermostat to desired setting.
10. Turn power back on at the electrical panel board.
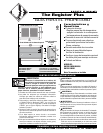
About the Manual Reset Temperature Limit Control
The heater is protected by a temperature-limiting control. The manual reset
temperature limit control is designed to open the heater circuit when excessive
operating temperatures are detected. The problem must be assessed and
the limit must be reset to resume operation.
Resetting the Manual Reset Temperature Limit Control
If the manual-reset limit control has opened the heater circuit due to excessive
operating temperatures, the heater will not work until the manual reset limit
button is pressed. After allowing the unit to cool for at least 10 minutes and
resolving the problem causing the limit to trip; use a narrow object such as
a ball-point pen to access the manual reset button through the lower-right
center section of the heater grill. Press FIRMLY and be sure to listen and feel
for a click, indicating it has been reset.
CONSULT LOCAL ELECTRICAL CODES TO DETERMINE WHAT WORK MUST BE PERFORMED BY QUALIFIED ELECTRICAL SERVICE PERSONNEL
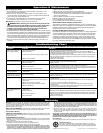
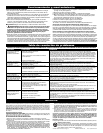
Symptom Problem Solution
Breaker trips immediately
upon energizing heater.
Heater fan operates, but
does not discharge warm air.
Heater will not shut off.
Heater discharges smoke
or emits a burnt odor.
Element heats for a moment
without the fan turning, then
immediately stops heating.
Heater does not run.
Heater continually trips the
manual reset temperature
limit control.
Troubleshooting Chart
1.Incorrect supply voltage.
2.Overloaded circuit.
3.A short circuit exists in the supply or heater wiring.
4.Defective circuit breaker.
1.Insufficient element temperature.
2.Incorrect supply voltage.
3.Element has failed.
1.Heat loss from room is greater than heater capacity.
2.Defective thermostat.
3.Thermostat wired incorrectly to heater.
1.Dust, lint or other matter has accumulated
inside heater.
1.Defective motor or internal connection.
2.Fan or motor jammed.
1.Thermostat set too low.
2.Heater has tripped the manual reset temperature
limit control.
3.Power not on at the circuit breaker.
4.Broken or poorly connected wire(s) to heater.
5.Defective thermostat.
1. Dust, lint or other matter has accumulated
inside heater.
2. Airflow is blocked.
3. Fan or motor is jammed.
4. None of the above.
1. Verify that supply voltage matches the heater rating.
2. The total amperage of all heaters on a branch circuit must not be more than 80% of the
amperage rating of the circuit breaker and supply wire ratings. Use a lower wattage heater,
or reduce the number of heaters on the circuit.
3. Shorted supply or heater wires may be accompanied by severe sparking. Inspect all supply
and heater wiring insulation for damage. Do not reset the circuit breaker until all electrical
shorts have been repaired.
4. Replace the circuit breaker.
1. Allow a few moments for element to reach operating temperature.
2. Verify that supply voltage matches the heater rating.
3. Replace element.
1. Close doors and windows. Provide additional insulation or install a higher-wattage heater
or multiple heaters if necessary (if your circuit is rated for more capacity).
2. Adjust thermostat to its lowest setting. If heater continues to run (allow two minutes for the
thermostat to respond), and room temperature is greater than 50 degrees; replace thermostat.
3. Refer to thermostat documentation and correct wiring.
1. Clean heater (see “Operation & Maintenance” section for instructions).
1. Heater or fan motor requires replacement.
2. Remove obstruction, and press heater manual reset button (see “Operation & Maintenance”
section for instructions).
1. Adjust thermostat to a higher temperature until heater operates (see Problem #6 if the
problem persists).
2. Press the manual reset button (see “Operation & Maintenance” section for instructions).
3. Turn on the correct circuit breaker in the main panel.
4. Turn off power at circuit breaker. Check supply wire continuity and proper connection
to heater wires.
5. The entire heater, or any of its components may be checked for continuity to determine
the cause of any problem. Repair or replace the heater.
1. Clean heater (see “Operation & Maintenance” section for instructions.)
2. Remove obstruction. Maintain a minimum distance of 6 inches from adjacent surfaces, 4.5 inches
from the floor, and 3 feet for furniture or other objects placed directly in front of the heater.
3. Remove obstruction, and press heater manual reset button (see “Operation & Maintenance”
section for instructions).
4. Replace heater assembly .
©2009 Cadet Manufacturing Co. Printed in U.S.A. Rev. 6/09 #720104
7. IN THE EVENT CADET ELECTS TO REPLACE ANY PART OF YOUR CADET PRODUCT, THE
REPLACEMENT PARTS ARE SUBJECT TO THE SAME WARRANTIES AS THE PRODUCT.
THE INSTALLATION OF REPLACEMENT PARTS DOES NOT MODIFY OR EXTEND THE
UNDERLYING WARRANTIES. REPLACEMENT OR REPAIR OF ANY CADET PRODUCT OR
PART DOES NOT CREATE ANY NEW WARRANTIES.
8. These warranties give you specific legal rights, and you may also have other rights
which vary from state to state. Cadet neither assumes, nor authorizes anyone to
assume for it, any other obligation or liability in connection with its products other than
as set out herein.
If you believe your Cadet product is defective, please contact Cadet Manufacturing Co. at
360-693-2505, during the warranty period, for instructions on how to have the repair or
replacement processed. Warranty claims made after the warranty period has expired will
be denied. Products returned without authorization will be refused.
Parts and Service
Visit http://support.cadetco.com for information on where to obtain parts and service.
Maintenance: For more effective and safer operation and to prolong the life of the heater, read
the Owner’s Guide and follow the maintenance instructions included with each heater.
Failure to properly maintain the heater will void any warranty and may cause the heater to
function improperly. Warranties are non transferable and apply to original consumer only.
Warranty terms are set out below.
LIMITED ONE-YEAR WARRANTY: Cadet will repair or replace any Cadet product, including
thermostats, found to be defective within one year after the date of purchase.
Extended Product Warranty
LIMITED FIVE-YEAR WARRANTY: Cadet will repair or replace any Register Plus (RM)
series element or motor found to be defective or malfunctioning from first date of purchase
through the fifth year.
THESE WARRANTIES DO NOT APPLY:
1. Damage occurs to the product through improper installation or incorrect supply voltage;
2. Damage occurs to the product through improper maintenance, misuse, abuse, acci-
dent, or alteration;
3. The product is serviced by anyone other than Cadet.
4. If the date of manufacture of the product cannot be determined;
5. If the product is damaged during shipping through no fault of Cadet.
6. CADET’S WARRANTY IS LIMITED TO REPAIR OR REPLACEMENT AS SET OUT HEREIN.
CADET SHALL NOT BE LIABLE FOR DAMAGES SUCH AS PROPERTY DAMAGE OR FOR
CONSEQUENTIAL DAMAGES AND/OR INCIDENTAL EXPENSES RESULTING FROM
BREACH OF THESE WRITTEN WARRANTIES OR ANY EXPRESS OR IMPLIED WARRANTY.
Reduce-Reuse-Recycle
This product is made primarily of recyclable materials. You can reduce
your carbon footprint by recycling this product at the end of its useful life.
Contact your local recycling support center for further recycling instructions.