


Zipper/piping Insertion 99
3
— — — — — — — — — — — — — — — — — — — — — — — — — — — — — — — — — — — — — — — — — — — — — — — — — — — —
Zipper/piping Insertion
A zipper and piping can be sewn in place.
There are many methods for inserting zippers and pipings. The procedures for inserting a centered zipper
and a piping are described below, with the adjustable zipper/piping foot.
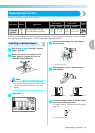
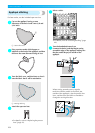
Inserting a centered zipper
a
Refer to step a–e of “Inserting a centered
zipper” (page 94).
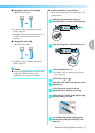
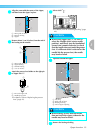
b
Remove the presser foot and presser foot
holder (page 44) to attach the screw-on
adjustable zipper/piping foot.
Note
z Use a screw driver to securely tighten the
screw that holds the presser foot. If the screw
is loose, the needle may break and cause
injures.
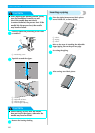
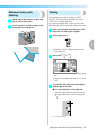
c
Select stitch
1
.
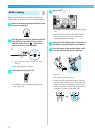
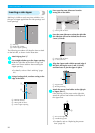
d
Loosen the positioning screw on the back of
the presser foot.
a Positioning screw
e
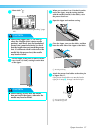
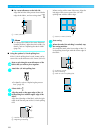
Slide the presser foot over either the left or
right feed dog.
f
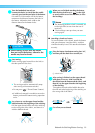
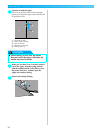
Change the needle position so that the needle
does not touch the presser foot.
For details, refer to “Adjusting the stitch width”
(page 56).
a Needle drop point
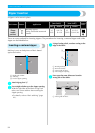
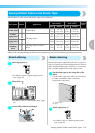
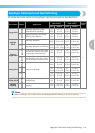
Stitch Name Pattern Application
Stitch Width
[mm (inch)]
Stitch Length
[mm (inch)]
Presser
Foot
Auto Manual Auto Manual
Straight stitch
(left needle
position)
1
Attaching zippers Sewing
concealed seams and piping
0.0
(0)
0.0–7.0
(0–1/4)
2.5
(3/32)
0.2–5.0
(1/64–3/16)
1
Left sewing position
Right sewing position
1