


Basic Stitching 83
3
— — — — — — — — — — — — — — — — — — — — — — — — — — — — — — — — — — — — — — — — — — — — — — — — — — — —
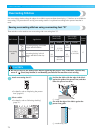
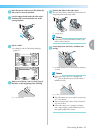
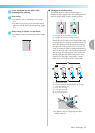
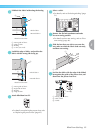
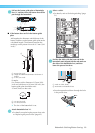
d
Lower the needle into the fabric at the
beginning of the stitching.
e
Start sewing.
• For details, refer to "Starting to sew" (page
55).
• For details on sewing reverse/reinforcement
stitches, refer to "Securing the stitching" (page
57).
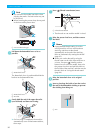
f
When sewing is finished, cut the thread.
• For details, refer to "Cutting the thread" (page
59).
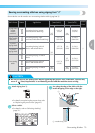
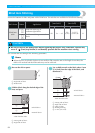
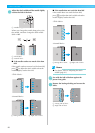
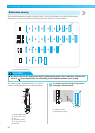
■ Changing the needle position
The needle position used as the baseline is
different for the straight stitch (left needle position)
and the straight stitch (center needle position).
a Straight stitch (left needle position)
b Straight stitch (center needle position)
When the stitch width of the straight stitch (left
needle position) is set to its standard setting (0.0
mm), the distance from the needle position to
the right side of the presser foot is 12 mm (1/2
inch). If the stitch width is changed (between 0
and 7.0 mm (1/4 inch)), the needle position will
also change. By changing the stitch width and
sewing with the right side of the presser foot
aligned with the edge of the fabric, a seam
allowance can be sewn with a fixed width.
a Stitch width setting
b Distance from the needle position to the right
side of the presser foot
c 12.0 mm (1/2 inch)
d 10.0 mm (3/8 inch)
e 6.5 mm (1/4 inch)
f 5.0 mm (3/16 inch)
• For details, refer to "Adjusting the stitch
width" (page 61).
a
b
0.0 2.0 5.5 7.0