


7
Assembly
Read entire operator’s manual before you attempt
to assemble or operate your new water transfer
pump.
Your water transfer pump requires some assembly and is
ready for use after it has been properly serviced with the
recommended oil and fuel.
If you have any problems with the assembly of your water
transfer pump, please call the water transfer pump helpline
at (800) 743-4115. If calling for assistance, please have the
model, revision, and serial number from the data tag
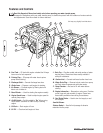
available. See Controls section for data tag location.
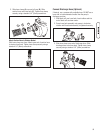
Unpack Water Transfer Pump
1. Remove the parts bag, accessories, and inserts
included with water transfer pump.
2. Open carton completely by cutting each corner from
top to bottom.
3. Ensure you have all included items prior to assembly.
Items in the carton include:
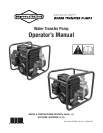
• Water pump
• Oil bottle
• Parts bag (which includes the following):
• This operator’s manual
• Owner’s registration card
• Strainer basket and barb
• Hose barb (2)
• Barb cuff (2)
• Rubber seal (2)
• Hose clamp (3)
• Anti-vibration kit
• Anti-vibration pad (4)
• Bolt (4)
• Washer (4)
• Lock nut (4)
• Instruction sheet
To prepare your water transfer pump for operation, you
will need to perform these tasks:
1. Fill out and send in registration card.
2. Attach anti-vibration pads.
3. Add oil to engine crankcase.
4. Add fuel to fuel tank.
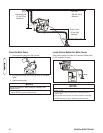
5. Attach suction hose.
6. Connect discharge hose (optional).
7. Move water pump to safe operating location.
8. Prime the water pump.
9. Locate strainer basket into water source.
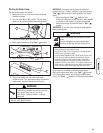
Attach Anti-Vibration Pads
You will need the following tools to install the anti-vibration
pads:
• 10mm wrench
• Socket wrench with a 10mm socket
Attach anti-vibration pads to water pump as shown on
instruction sheet included with anti-vibration kit.
IMPORTANT: You must attach anti-vibration pads prior to
adding engine oil and fuel.
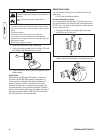
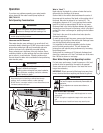
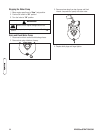
Add Engine Oil
1. Place water transfer pump on a flat, level surface.
2. Clean area around oil fill and remove yellow oil fill cap.
NOTE: See Oil Recommendations in Maintenance section.
Verify provided oil bottle is the correct viscosity for current
ambient temperature.
3. Using oil funnel (optional), slowly pour contents of
provided oil bottle into oil fill opening.
4. Replace oil fill cap and fully tighten.
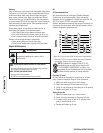
Add Fuel
Fuel must meet these requirements:
• Clean, fresh, unleaded gasoline.
• A minimum of 87 octane/87 AKI (91 RON). High
altitude use, see High Altitude.
• Gasoline with up to 10% ethanol (gasohol) or up to
15% MTBE (methyl tertiary butyl ether) is acceptable.
To protect the fuel system from gum formation, mix in a fuel
stabilizer when adding fuel. See Storage. All fuel is not the
same. If you experience starting or performance problems
after using fuel, switch to a different fuel provider or change
brands. This engine is certified to operate on gasoline. The
emission control system for this engine is EM (Engine
Modifications).
NOTICE
Improper treatment of water transfer pump can damage it
and shorten its life.
• DO NOT attempt to crank or start the engine before it has been
properly serviced with the recommended oil. This may result in
an engine failure.
NOTICE
Avoid water transfer pump damage.
Failure to follow Operator’s Manual for fuel
recommendations voids warranty.
• DO NOT use unapproved gasoline such as E85.
• DO NOT mix oil in gasoline.
• DO NOT modify engine to run on alternate fuels.