


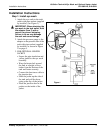


10-Gallon Tank with Eye Wash and Optional Heater Jacket
Installation Instructions S19-690LHS, S19-690H
Bradley Corporation • 215-084 Rev. L; EN 02-586 5
Maintenance Instructions
WARNING: Water preservatives protect potable water from bacteria, fungi and algae
growth for up to four months. If a water preservative is not used with this eye wash, it is
recommended that the tank be cleaned weekly or as often as needed. Infection, loss of
vision or other serious injury may result from misuse of this eye wash. DO NOT use
expired, cloudy, colored or contaminated solution. DO NOT open preservative bottle if
safety seal is broken. DO NOT save unused solution.
Step 1: Inspect eye wash unit
1. Visually inspect the pressure gauge weekly to ensure the unit is maintaining the proper pressure.
If the unit is not working properly, remove it from the hazard area immediately and refer to the
troubleshooting instructions. For further assistance, contact the Bradley Corporation.
Step 2: Clean eye wash unit
When using potable water only:
1. Empty the tank any time from once per week to once per month, depending on the quality of
your water supply. The manufacturer is not responsible for variations in the water supply.
2. Clean the inside of the tank using warm water and mild soap. Rinse the tank thoroughly with
warm water.
3. Refill the eye wash tank following the procedure outlined in Step 2 found on page 4.
When using potable water and water preservative (recommended):
1. Empty the tank at least once every 120 days.
2. Clean the inside of the tank using warm water and mild soap. Rinse the tank thoroughly with
warm water.
3. Refill the eye wash tank with potable water and the contents of an 8-ounce bottle of water
preservative (refer to the procedure outlined in Step 2 found on page 4).
• To order potable water preservative, contact your Bradley representative or local distributor
and ask for part number S19-865.
Troubleshooting
1. If pressure relief valve relieves prior to the required pressure, do the following (when in the
unpressurized condition):
• Tighten the valve completely into the cap by turning the gray hex head portion of the pressure
relief valve clockwise. Do not use a wrench.
• Pull up on the relief valve ring and ensure that the ring is not preventing the valve from closing
completely. Push on the center pin of the relief valve to ensure that it is completely closed.
Repressurize tank to required pressure. This may have to be done several times to get the valve
to seat completely.
2. If the pressurized tank loses pressure over time, check the connections with diluted liquid dish
soap or children’s bubbles to identify the leak location. Tighten the connection slightly and test
again.