


Fill the heater with water, opening a hot water faucet to allow trapped air to escape. Check hand
holes for tightness. Check the fuel supply and all fuel lines for tightness. Rotate the blower wheel to
loosen the pump shaft seal. Bleed air from the oil line by opening the bleed valve on the fuel pump.
Attach a small plastic tube to the bleed valve fitting on pump and run to a gallon container. Turn on
the electricity and set the thermostat sot eh burner motor runs. The heater will not ignite when the
bleed valve is open. Bleed the line until the oil is completely clear (not milky or opaque), transparent
and free of air bubbles and froth.
1. Start the burner and adjust draft to the -.02 in H
2
O to -.05 in H
2
O.
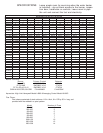
2. Verify that the pump pressure matches the values in the chart.
3. Check the smoke and adjust the air to give #1 smoke.
4. Readjust to give a trace or zero smoke.
5. Check that the CO
2
/O
2
level is at 11% or higher. Note: Do no attempt to adjust the burner without
instruments.
6. Open the air adjustment to lower the CO
2
by .5% or 1% to allow for draft and fuel variations (refer
to the burner manufacturer’s recommendations).
The thermostat has been adjusted to 120°F at the factory. Wait until thermostat has shut off fuel to
the main burner; wait 30 seconds following shut off of fuel, then set thermostat to the highest temper-
ature. The main burner should re-light. Set thermostat to the lowest temperature; the main burner
should go out. The thermostat should be adjusted in accordance with the local codes or to the mini-
mum setting that will meet the hot water needs of the consumer. Bock recommends 120°F tempera-
ture settings for residential applications for safety as well as energy efficiency.
1. Check the fuel supply, electrical wiring and fuses. Make sure the temperature control is set for heat.
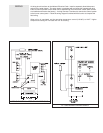
2. If the motor runs but there is no flame, remove the electrode assembly, clean and readjust (see
Figure 5). Check the electrode porcelain for cracks and replace if necessary. Check the transformer
to see of it is producing a strong spark. (Use extreme caution – the transformer has a 10,000 volt
output.) Check that the coupling between the motor and pump shaft is not slipping. Check the set
screw on the blower wheel for tightness. Clean or replace the nozzle if necessary, always using the
correct size and spray angle provided by the manufacturer.
3. Bleed the pump to make sure the oil is clear and free of air bubbles. If the oil is milky or frothy,
check the line for air leaks at fittings. Check the oil filter gaskets and make sure the filter cartridge is
clean.
4. If the burner motor does not run, check the motor thermal overload button (red) and reset. If the
burner motor does not run after pushing the red button on the back of the motor, turn the motor off
and check the motor shaft to see of it is tight. Check the pump shaft; if it is free and the motor will
not run, replace the flame detector located in the burner housing. Turn on the current and reset the
control (relay). If the motor still does not run, replace the control (relay). If motor hums and gets hot,
replace the motor.
5. If the burner ignites and runs a short time (10 to 15 seconds) and goes out on safety, replace the
flame detector. If the burner still runs only a short time, replace the control.
6. The smell of oil or combustion products may be caused by poor draft or lack of combustion air.
Remove and clean the electrode assembly and check the draft in the connector directly above the
heater. There should be at least .01 inches W.C. draft (pull) or greater.
Lime and sediment: Such accumulations can be controlled to an extent by softening the water. The
tank should be inspected every six months by draining the tank, removing the hand hold cover, and
making a visual check of the tank interior. If lime (or sediment) has accumulated, it should be
removed by use of a commercial lime dissolving chemical or by scraping loose the deposit and flush-
ing it away through the hand hole drain.
Excessive pressure is controlled by the T&P relief valve. Water expands when heated and the
extra volume of water must have a place to go. If water cannot expand into the cold water line
because of a check valve, pressure builds as the water heats. The pressure relief valve opens, and
dumps the extra volume of water. If the relief valve is faulty or none has been installed, the tank can
fail due to this excessive pressure. Open the relief valve at least once a year to make sure the seat
is not stuck.
Caution: Before opening the relief valve be certain that the discharge line directs the water away
from anything that could damaged or would block the flow of water to the drain. Stand away from the
outlet to avoid contact with the water.
PUTTING HEATER
INTO OPERATION
SET DRAFT AND
ADJUST BURNER
COMBUSTION (see
burner instructions)
SERVICE:
Regular mainte-
nance will keep the
water heater operat-
ing at peak efficien-
cy. The tank can fail
prematurely from
the accumulation of
lime and sediment in
the bottom, exces-
sive pressure and/or
corrosion.