


7
ENGLISH
(Original instructions)
Important! Ensure that the variable steam jet nozzle (27) is
securely fastened before using the hand held steam cleaner.
If steam escapes from the joint then the variable steam jet
nozzle is not correctly t, allow the unit to cool then remove
and re-t the variable steam jet nozzle.
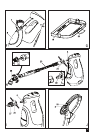
Attaching other accessories (Fig. H)
u Align the lugs on the hose with the recesses on the acces-
sory.
u Press the accessory (25) onto the hose (23) and twist
anti-clockwise until the accessory clicks into place.
Note! The variable steam jet nozzle may be used without the
hose by tting them directly to steam nozzle. All other acces-
sories must be connected to the hose for use.
Removing the hose and accessories(Fig. H & I)
Warning! The Steam nozzle, variable steam jet nozzle, hose
and accessories become hot during use. Allow the unit and all
accessories to cool before removing any accessories.
Removing an accessory (Fig. H)
u Twist the accessory (25) clockwise then pull away from
the hose (23).
Removing the hose (Fig. H)
u Press in the clips (24) on either side of the hose (23) and
pull away from the steam nozzle (4).
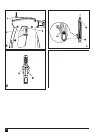
Removing the variable steam jet nozzle (Fig. I)
u Press in the clips (26) on either side of the variable steam
jet nozzle (27) and pull away from the steam nozzle (4).
Use
Important! This unit will kill 99.9% of bacteria & germs when
used in accordance with this manual and with the micro bre
pad tted and a continuous run time of 90 seconds.
Switching on and off (Steam mop)
u To switch the appliance on, press the ON/OFF button (1).
It takes approximately 15 seconds for the steam mop to
heat up.
Note: When the steam mop is rst turned on the water res-
ervoir will glow red. Once the steam mop is ready to use the
water reservoir will glow blue.
u To switch the appliance off, press the ON/OFF button (1).
Caution! Never leave the steam mop in one spot on any
surface for any period of time. Always place the steam mop on
the resting mat (13) with the handle (10) in the upright position
when stationary and make sure the steam mop is turned off
when not in use.
Caution! Always empty the steam mop after use.
Note: When rst lled or after running dry it can take up to 45
seconds for steam to be produced.
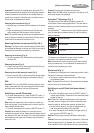
Autoselect
TM
Technology (Fig. J)
This steam mop is tted with an Autoselect
TM
button (6)
which shows various cleaning applications. They are used to
select the correct operating mode for your particular cleaning
operation.
Using Autoselect
TM
, choose from one of the following applica-
tions by pressing the autoselect button (6) until the required
setting is selected:
Wood/Laminate
Stone/Marble
Tiles/Vinyl
The steam mop will select the correct volume of steam
required for your particular cleaning operation.
Note: Always check you are using the correct setting before
using your steam mop. For convenience the steam mop will
remember the last setting you chose.
Steam burst (Fig. J)
The steam mop is equipped with a steam burst button to aid in
the removal of stubborn marks and stains.
u During use, press the steam burst button (28) to apply
extra cleaning power.
Note: The steam burst will last for 10 seconds then the steam
mop will return to the chosen setting.
Switching on and off (Hand held steam cleaner)
(Fig. K)
u To switch the appliance on, press the ON/OFF button (1).
It takes approximately 15 seconds for the hand held steam
cleaner to heat up.
Note: When the hand held steam cleaner is rst turned on
the water reservoir will glow red. Once the hand held steam
cleaner is ready to use the water reservoir will glow blue.
u Lift the lock off switch (2) and pull the trigger switch (3).
After a few seconds steam will be produced.
u To switch the appliance off, release the trigger switch (3)
then press the ON/OFF button (1).
Caution! Always empty the hand held steam cleaner after
use.
Caution! Steam may continue to be produced for a short time
after the trigger switch (3) is released, this is normal. Switch
off and allow the unit to cool before removing any accessories.