


Disinfect tank:
1. Fill tank with 1 teaspoon of bleach and 3.5 litres
of water.
2. Let the solution stand for 20 minutes, swishing
every few minutes. Wet all surfaces.
3. Empty the tank after 20 minutes, and rinse well
with water until the bleach smell is gone.
Leave to dry
4. Refill the water tank with cool water; replace
the water tank. Repeat Operating Instructions.
STORAGE INSTRUCTIONS
If your humidifier will not be in use for two days or
more, or at the end of the season follow these
instructions.
1. Clean, rinse and thoroughly dry the humidifier
as directed in the De-scaling Maintenance
section. DO NOT leave any water inside the
base or tray.
2. Remove the reservoir cap. Do not store with
the reservoir cap in place.
3. Place the humidifier in the original carton and
store in a cool, dry place.
4. Clean the humidifier before the next season
begins.
SERVICE INSTRUCTIONS
1. Do NOT attempt to repair or adjust any
electrical or mechanical functions on this unit.
Doing so will void the warranty. The insides of
the unit contain no user serviceable parts. Only
qualified personnel should perform all
servicing.
2. If you need to exchange the unit, please return
it in its original carton, with a sales receipt, to
the store where you purchased it.
5
FOR U.K. AND IRELAND ONLY:
If the plug is not suitable for the socket outlets in
your home, it can be removed and replaced by a
plug of the correct type. Please refer to
"Installation of a plug" below.
Installation of a plug
Applicable to U.K. and Ireland
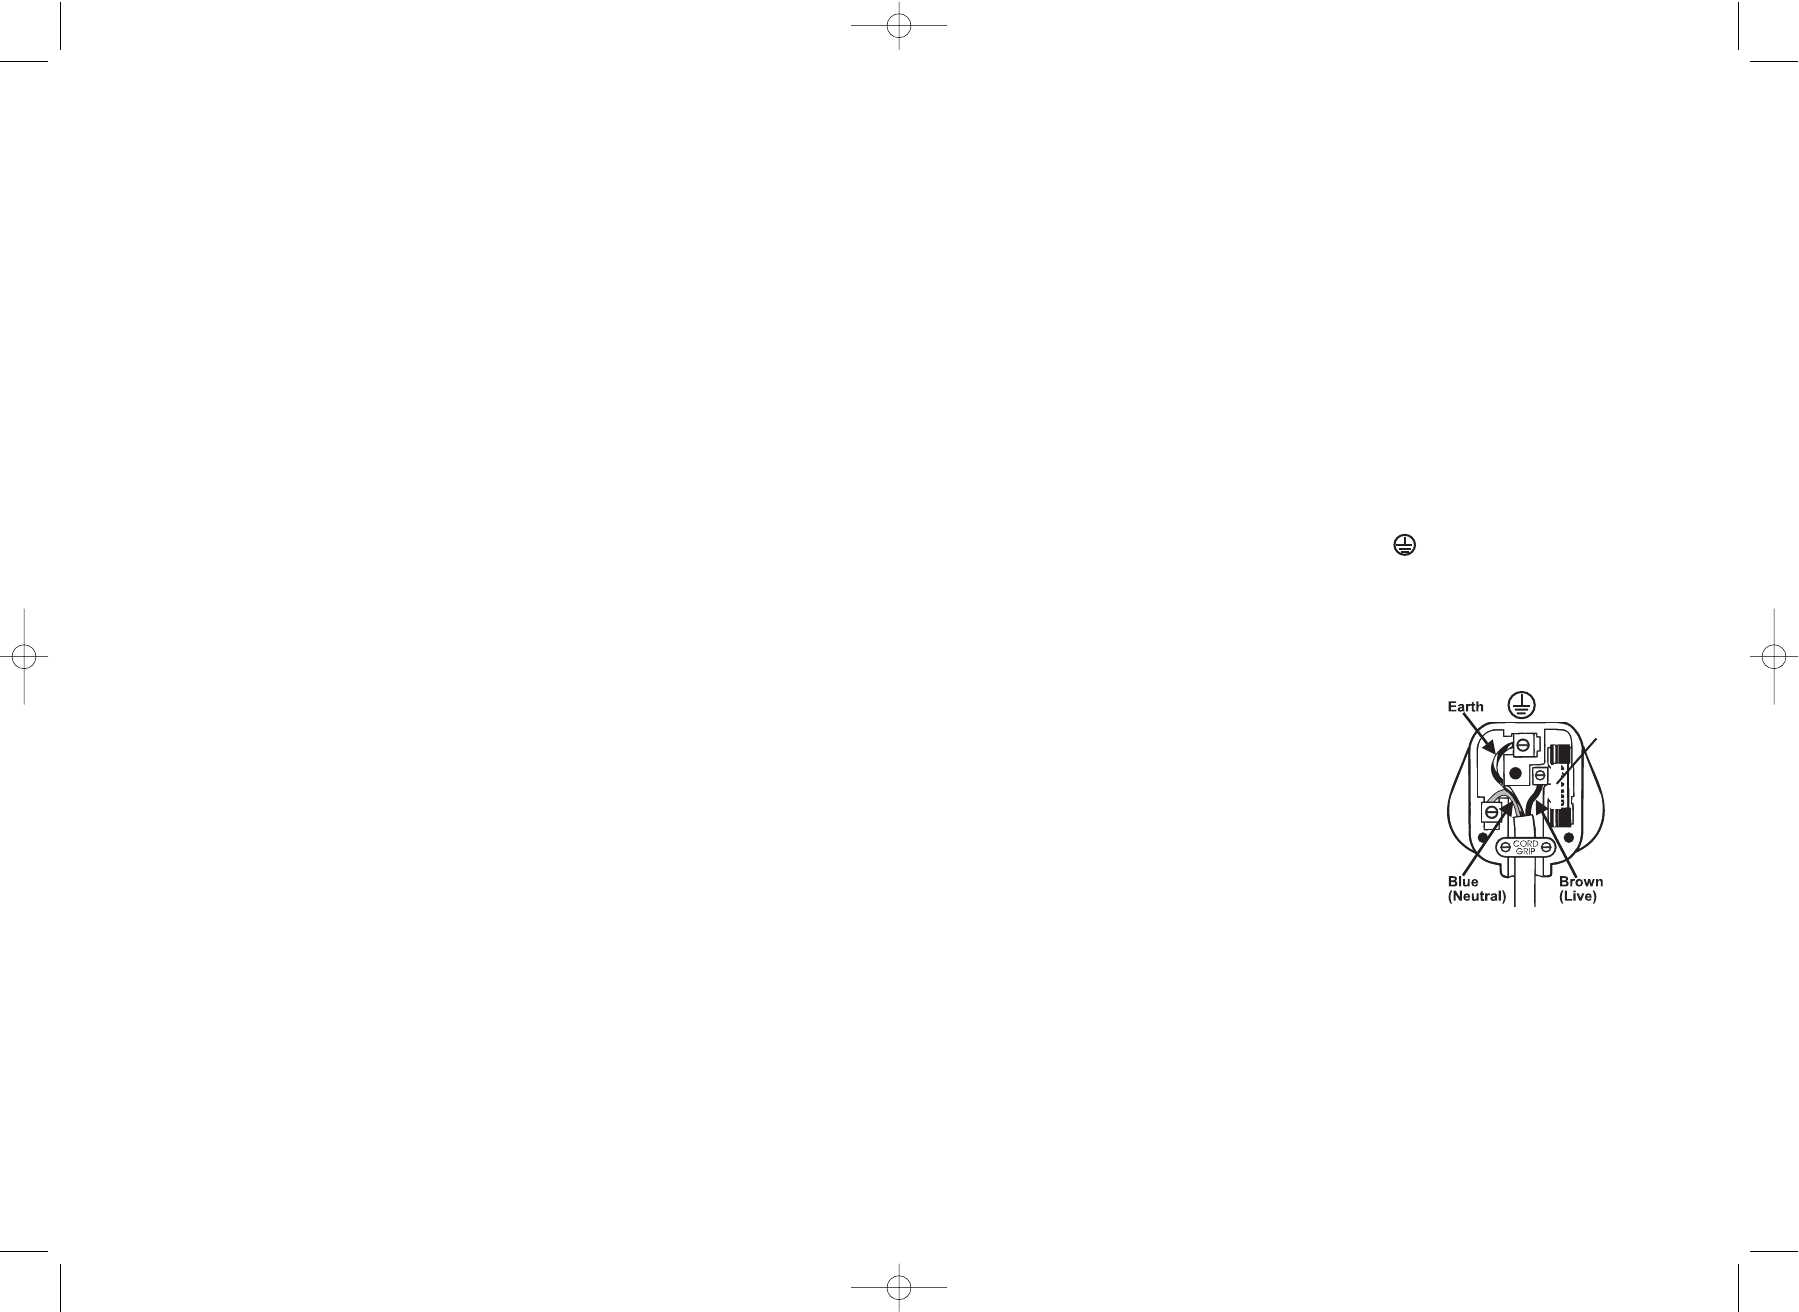
WARNING - THIS APPLIANCE MUST BE
EARTHED
The wires in the mains lead are coloured as
such:
GREEN AND YELLOW - EARTH
BROWN - LIVE
BLUE - NEUTRAL
Please note that the colour of these mains wires
may not correspond with the colour markings
that identify the terminals in your plug. Please
proceed as follows:
The wire which is coloured GREEN AND
YELLOW must be connected to the terminal
which is marked with the letter 'E' or by the earth
symbol or coloured GREEN or GREEN AND
YELLOW.
The BROWN coloured wire must be connected
to the terminal, which is marked with the letter
"L" or is coloured RED.
The BLUE coloured wire must be connected to
the terminal, which is marked with the letter "N"
or is coloured BLACK.
NOTE: If the terminals in the plug are not marked
or if you are unsure or in doubt about the
installation of the plug please contact a qualified
electrician.
If a 13A 3-pin plug is fitted, it must be an ASTA
approved plug, conforming to BS1363 standard.
Replacement 3A fuses must be BSI or ASTA
BS1362 approved.
3 amp
3. Rinse with clean warm water to remove scale
and the white vinegar solution before beginning
to disinfect the tank.
4. Wipe the heating element clean with a soft
cloth after it has had a chance to cool.
Let solution stand 20 minutes, cleaning all
interior surfaces with a soft brush. Dampen a
cloth with undiluted white vinegar and wipe out
entire tray to remove scale.
THIS PRODUCT IS MANUFACTURED TO
COMPLY WITH THE E.E.C. DIRECTIVES
73/23/EEC and 89/336/EEC.
water in the Heating Chamber is almost empty, the
Red RESET light will illuminate and the Automatic
Shut Off will activate.
The unit will not operate again until you refill the
Water Tank and reset the Humidifier as follows.
1. Unplug the unit.
2. Remove and refill the Water Tank, being sure to
follow the Maintenance Instructions. Replace
the Tank onto the Base.
3. Wait 5 minutes for the Automatic Shut-Off to reset.
4. After the 5 minutes, plug in the unit and turn the
unit on. The RESET light should now be off (if
not repeat steps 1 through 4). In about 5
minutes, the Humidifier will begin to produce
moisture.
If you do not plan to use the Humidifier for two or
more days, make sure any residual water is
drained from the Water Tank and Base to prevent
algae or bacteria growth.
USING THE PROGRAMMABLE TIMER
A
ccuSet Plus™ allows the user to program the
Humidifier to come on at a preset time, or turn off
after a set amount of time.
Setting the Off Timer:
1. Select the Mode and temperature you wish
the Humidifier to run in.
2. While the Humidifier is running, press and hold
the Up and Down Buttons simultaneously for 2
seconds. The display will flash "00".
3. By pressing the Up and Down Buttons,
program the Humidifier to turn off up to 16
hours later in increments of 1 hour.
4. After setting the timer, the display will return to
show the current room temperature. An
indicator on the display will illuminate to show
that the timer is activated.
5. After the predetermined length of time has
passed, the Humidifier will automatically shut off.
Setting the On Timer:
1. While the Humidifier is off, press and hold the
Up and Down Buttons simultaneously for 2
seconds. The display will flash "00".
2. By pressing the Up and Down Buttons,
program the Humidifier to turn on up to 16
hours in advance in increments of 1 hour.
3. After the preset length of time has passed, the
Humidifier will automatically turn on in Auto
Mode HI at 45%.
CLEANING AND MAINTENANCE
INSTRUCTION
The following maintenance procedures
must be routinely followed in order to
ensure proper, efficient operation of your
humidifier. The unit WILL FAIL if it is not
cleaned properly.
Regular cleaning prevents scale build-up on the
heating element and tray. It also prevents micro-
organisms from growing on the tray and tank. This
ensures that maximum efficiency will be achieved.
We cannot over-emphasize how essential proper
cleaning is to the maintenance and continued use
of your unit and the avoidance of algae or bacteria
build-up.
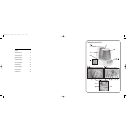
Regular Maintenance
1. Be sure the unit is OFF and is disconnected
from the electrical outlet.
2. Remove the Water Tank then unlock the
Housing by moving the two Locks towards the
front of the humidifier. Lift the Housing from the
Base.
3. Empty water and minerals from the Base and
place in the top rack of the dishwasher.
NOTE: the Base is dishwasher safe
TOP RACK ONLY.
4. Drain the water from the Tank into the sink and
rinse tank thoroughly. Leave to dry.
5. Wipe the Heating Element clean with a soft
cloth after it has had a chance to cool.
The Electronic Thermal Control Heating
element is lined with a Teflon® coating that is
designed to provide the easiest cleaning and
prolong the operating efficiency of the
Humidifier. DO NOT use any metal or hard
objects to clean the Heating Element
6. Replace the Housing and lock onto the Base.
7. Follow Operating Instructions.
NOTE: Never use detergents, gasoline, kerosene,
glass cleaner, furniture polish, paint thinner or and
other household solvent to clean any part of the
Humidifier.
De-scaling Maintenance
Scale needs to be removed as it becomes
noticeable. We recommend using Bionaire
TM
Clean Away - Humidifier cleaning solution.
Apply Solution with a plastic brush to scale
surfaces.
Let it soak until residue is softened.
For cleaning the tank, mix 2 capsules of solution
with 2 litres of water. Let mixture stand for
several minutes, swishing every few minutes.
Drain solution and THOROUGHLY RINSE
the tank.
1. Repeat steps 1-3 in the Maintenance section.
2. Clean the tray by partially filling the tray with
200ml of undiluted white vinegar. If the element
is heavily scaled, plug the humidifier into an
electrical socket and turn it ON for no longer
than 15 seconds. After this time turn the
humidifier OFF and unplug it from the electrical
outlet.
4
BWM8305/8305CI/IUK04M1 V.qxd 4/30/04 17:00 Page 9