


Part No 790294 Form No F062906A
9
QL2300 Owner’s Manual
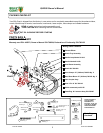
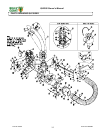
ASSEMBLY
OPERATION
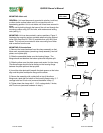
1. SECURELY ATTACH unit to the bed of a truck or to a trailer, so that the exhaust discharges into an enclosed container. NOTE:
This unit must be securely mounted to the bed of a truck or to a trailer before operating.
2. ATTACH hose to hose coupler, using hose clamp (item 26) NOTE: This unit is equipped with a unidirectional hose. Assemble
hose so that interior hose material seams face toward unit. Refer to flow direction arrow printed on outside of hose. When installed
arrow should point toward vac housing.
3. ATTACH hose coupler w/hose to housing intake, which is preassembled to housing front plate, and rotate to lock it in place.
4. ASSEMBLE handle loop nozzle (item 45), to nozzle handle (item 44) using capscrew (item 53), and lock nut (item 60). Adjust
handle loop to desired height and angle and securely tighten in place.
5. ASSEMBLE nozzle handle (item 44), to nozzle (item 25), using screws (item 52), washers (item 66), washers (item 68) and lock
nuts (item 60).
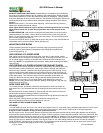
8. ATTACH assembled nozzle to hose using hose clamp (item 26). Before tightening hose clamp, position nozzle handle upward
when hose is stretched to prevent twisting load on hose assembly during operation.
9. ATTACH preassembled hose boom on top of housing using a hitch pin (item 10).
10. ASSEMBLE hose band (item 29) around hose and secure chain between flanges of the hose band using capscrew (item 53)
and lock nut (item 60) Repeat same steps on the other chain. (See ADJUSTING HOSE BOOM on page 11).
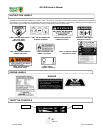
11. SECURELY ATTACH exhaust elbow (item 21) capturing both flanges inside the clamp, then firmly tighten the clamp, securing
the elbow to the housing (see MOUNTING on page 10).
12. ASSEMBLE battery (not included) by using battery bracket QL (item no. 70, hold down rods (item 71), washers (item 70), and
lock nuts (item 59).
13. ATTACH red battery cable to + terminal and black battery cable to - terminal.
Like all mechanical tools, reasonable care must be used when operating machine.
Inspect machine work area and machine before operating. Make sure that all operators of this
equipment are trained in general machine use and safety.
PUT OIL IN ENGINE BEFORE STARTING
STARTING
SECURE LOADER TO TAILGATE OR MOUNTING
ENGINE: See engine manufacturer’s instructions for type and amount of oil and gasoline used. Engine must be level when
checking and filling oil and gasoline.
ENGINE SPEED: Controlled by throttle lever on the vac housing. Under normal conditions, operate at minimum throttle to
accomplish your current cleaning task.
INTAKE HOSE: Hose mounting assembly must be properly attached to vac housing and safety switch must be engaged before
engine will start. Note: Any damage to the switch or wiring harness will prevent engine from starting.
CHOKE: Located on the vac housing as part of the engine control panel.
THROTTLE: Move throttle control to fast position.
KEY SWITCH: Turn to start position until engine begins to fire, immediately release the key to the run position.
Note: Do not hold key in start position more than 10 seconds per attempt.
IF YOUR UNIT FAILS TO START: See Troubleshooting on page 13. Also see engine owner's manual.
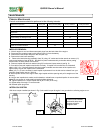
HANDLING & TRANSPORTING:
The unit is equipped with small front wheels to allow for easier transportation to storage. With unit removed from its
mounting, tilt unit forward toward the ground and use wheels to maneuver it into storage area.
HOSE: DO NOT drag the hose with vehicle.
Never lift the machine while the engine is running.
ALWAYS ATTACH NOZZLE TO THE TRAY BEFORE TRANSPORTING UNIT