


75.1035 V1 Feb 2001 Page 5 of 8
ON SITE ADJUSTMENTS
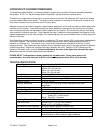
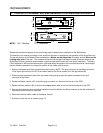
1. Position of the Master and Slave Modules in the Aluminum Extrusion
NOTE: RX = Receiver TX = Transmitter
Please use the above diagrams for the terminology used to describe the installation of the SuperScans.
The position of the master and slaves in the aluminum extrusion is important to the operation of the SuperScan unit.
The correct position of the Master/Slave combination is Master on the Hinge side of the door and the Slave on the
Leading edge side of the door. The modules will have to be change for at least one side of the door because the
SuperScan is factory preset to accommodate a right hand activation and/or left hand safety installation. Therefore,
if the installation is left hand activation and/or right hand safety the position of the modules should be interchanged.
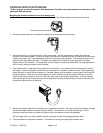
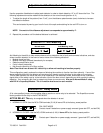
Use the following procedure to change the position of the master and the slave:
1. Remove the Master and Slave modules from the housing. (NOTE: The plug connector on the Master module is
in the upper right corner of the PC & the ribbon cable on the Slave module is on the right hand side)
2. Disconnect the blue ribbon cable from the master making sure to leave the cable connected to the input
connector of the Slave.
3. Rotate the Master module 180° so that the plug connector is in the lower left corner of the PCB.
4. Rotate the Slave module 180° so that the blue input ribbon cable is now on the left hand side of the PCB.
5. Remove and rotate the white mounting brackets on both the Master and Slave modules so that the modules will
snap back into the aluminum extrusion.
6. Reconnect the blue ribbon cable to the Master module.
7. Continue to wire the unit as listed on page 14.
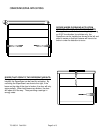
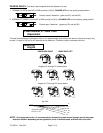
RX
TX
RED
LED
MASTER MODULE
distance
o
u
t
p
u
t
J1
P1
J2
GREEN
LED
terminal
J1 anti-masking function
hold time potentiometer
NO/NC Mode
1.5”
10.91”
-
+
J1 anti-masking function
1.5”
8.75”
RX
TX
RED
LED
SLAVE MODULE
distance
o
u
t
p
u
t
i
n
p
u
t
-
+
J1