


75.1035 V1 Feb 2001 Page 4 of 8
SUPERSCAN INSTALLATION PROCEDURES
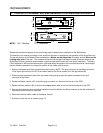
**B.E.A. sensors, as with all automatic door equipment, should be set up and inspected in accordance with
applicable ANSI standards.
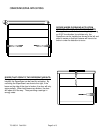
Mounting the aluminum extrusion to a door jamb or wall.
1.
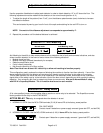
Remove the screws and end caps and snap the Plexiglas from the top edge by pulling out from the top.
Pull lens out from the top !
2.
Unclip the plastic supports as to allow the modules to be removed from the housing.
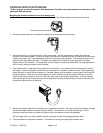
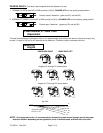
3. Hold the extrusion up to the door where it is to be mounted. Use the chart below to install the aluminum
extrusion on the door properly. Be sure to mount the housing in a location that will not interfere with door arms,
hinges, slide tracks, etc. Once positioned, mark the housing for screw locations. Drill clearance holes for the
type of screws that need to be used. The holes may need to be countersunk if they align with the plastic
support clips for the modules. The SuperScan extrusion does not come pre-drilled due to varying applications
since it can be ceiling mounted or face mounted.
4.
Once installed, drill a clearance hole, parallel with the extrusion, in the jamb to allow the wires to be routed to
the header. Surface-mounted wiremold may be necessary for a raceway if jambs are solid. When selecting a
side of the door to mount the wire transfer on, consider factors such as weather, and the type of traffic that will
be using the door. Most often it is advantageous to install the door loop on the inside of the door and drill a
hole through the door frame to allow the use of one door loop for wiring both SuperScans. Use the supplied
door loop to secure the wiring coming out of the SuperScan housing at the end cap and also at the entry point
at the jamb tube as shown on drawing.
5.
Run the connection cable from the header to the SuperScan extrusion. Be sure to route the conductor through
the flexible sheath between the jamb and the extrusion. Once wire is run, install the jamb cap. On the
extrusion's end cap, break out the part of the end cap on the bottom to allow wire passage.
Drill a through-hole in the door between the two extrusions to allow wire passage between them.
6. This concludes the installation procedure. Proceed to the wiring and configuration section next.