


Manual 2100-506D
Page 4 of 14
DESCRIPTION
The CHDM dehumidifier is designed to be used with
Bard 3 through 5 ton CH heat pump models. It will be
installed in the outdoor section of the CH unit. The
dehumidifier incorporates a complete refrigeration
system. It will share the high & low voltage control
from the CH control panel. The CHDM is for use in
CH*S Series units with or without CHERV or CHCRV.
The CHDM cannot be used in units equipped with
economizers CHEIFM.
SHIPPING DAMAGE
If a shipment is damaged or the piece count does not
agree with the quantity shown on the freight bill, the
buyer/receiver should make note on all copies of the
freight company’s delivery receipt of any damages and/
or shortages at the time of delivery. The receiving agent
and the freight company’s agent should both sign the
delivery receipt and the bill of lading. It is preferred,
that both signatures are obtained at the time of delivery.
If at all possible at the time of delivery, photograph the
noted damages as evidence to support a freight claim.
The damage and/or shortage notation on the delivery
receipt does not constitute a claim. It is the recipient’s
responsibility to initiate the claim process by requesting
an inspection and requesting a claim number from the
freight carrier. Save all noted freight bills, bills of
lading, delivery receipts, packing sheets and invoices for
documentation that will be required to support an
itemized claim.
For concealed damage you must immediately notify the
delivering freight carrier by phone and request an
inspection. Many freight carriers will not honor concealed
damage claim beyond 48 hours from the time of delivery
or if the product has been moved to another location other
than the ship to address. Most freight carriers will
challenge claims written after a two-week period.
GENERAL
The CH Dehumidifier equipment covered in this manual
should be installed by trained, experienced service and
installation technicians.
IMPORTANT
Make sure cabinet insulation does not tear!
While these instructions are intended as a general
recommended guide, they do not supersede any national
and/or local codes in any way and are not intended as a
step-by-step procedure with which the mechanically
inclined owner can install the package. See Page 3 for
information on codes and standards.
The dehumidifier is shipped in one carton and contains
the electrical harness, miscellaneous hardware and
installation instructions. Where local regulations are at
a variance with instructions, installer should adhere to
local codes.
INSTALLATION
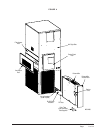
DEHUMIDIFIER: Unpack the dehumidifier. Set
aside the sheet metal duct for now. Facing the outdoor
section of the CH model, on the right-hand side, there is
a long, narrow access panel. Remove this panel and set
aside. (See Page 11, Figure 4.)
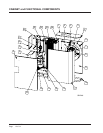
Remove the fill plate located in the bottom of this
compartment by unscrewing the four screws. Remove
the 1½" knockout and clear the insulation hole. Place
fill plate back in the unit. With a marker, trace the 1½"
hole onto the screen below. Remove the fill plate again
and cut out marked hole. Place fill plate back into unit
and reattach with four screws.
Place the dehumidifier in this opening by placing the
wedge end of the cabinet in first and slide all the way
back (see Figure 4).
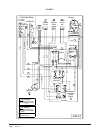
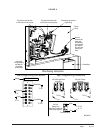
WIRING: Remove the knockout in the back of the CH
control panel and insert bushing (see Figure 2). Route
high and low voltage wires into the CH control panel
through the bushing. Connect per Figures 1 & 2.
Connect a humidistat (field-supplied) per the low
voltage connection diagram in the CH Literature.
WARNING
Open and lock unit disconnect switch before
installing this accessory to prevent injury or
death due to electrical shock or contact with
moving parts. Turn thermostat to OFF.