


MODELS 341A-342A-344A
5
Secure support (41) to bracket (35) with capscrews (39) and
washers (40). Frame sizes 143 thru 184-JM Model 341A
only.
7. If nameplate (34) was removed, install and attach with
screws (33).
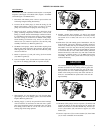
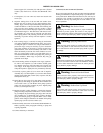
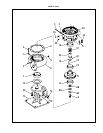
8. Wipe the sealing faces of the seat and seal washer clean.
Replace pin (61) in sleeve if it was removed during disas-
sembly. Apply a film of liquid dishwashing detergent to the
washer and bellows of the seal and slide the remaining seal
parts onto the sleeve making sure the washer is seated
against the seal seat. Check the proper sequence of assembly
as indicated in Figure 1. The shaft sleeve with the seal rotat-
ing assembly on it may now be replaced onto the motor
shaft. Spring tension will probably prevent the sleeve from
remaining in position axially until the impeller is locked
against it.
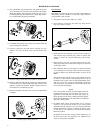
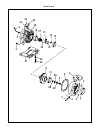
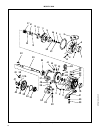
9. Press wearing ring(s) (7 and 16) in casing (6) and bracket
(35). Rings should not be hammered into place. Use a press,
or clamp the parts in a bench vise, using wooden blocks to
protect the rings. It may be necessary to pin or dowel the
rings after assembly if the insert or casing has had rings
replaced before, since each reassembly can stretch or tear
metal and thereby loosen the fits. If the facilities are avail-
able, it is good practice to take a very light finish cut or to
ream the inside diameter of the casing rings after pressing to
restore roundness. When rings are pressed, they may get
squeezed out of shape.
10. Coat the mating surfaces of impeller wear ring(s) (optional -
14 and 15) and impeller (11) with Locktite sealant grade
271. Replace wear rings, using the same care as for the case
wear ring(s). If the rings are to be trued on a lathe, do not
clamp the impeller so tightly that it is permanently distorted.
11. Carefully replace gasket (10) on motor end of impeller.
Assembly key (12) and impeller (11) to motor shaft. Secure
impeller with gasket (9B), washer (9A), capscrew seal (9C)
and impeller screw (9).
12. Install the two pipe plugs (4) in the pump casing. Position
the gasket (8) and casing (6) against the motor bracket and
secure with screws (5). On Model 342A pumps position
gasket (72) and set pump assembly in place. Tighten pump
to base (73) with capscrews (39).
13. Replace all relief, cooling, flushings, or drain lines from the
pump including compression connections (1 and 2) and tub-
ing (3). Replace all grease fittings pipe plugs, tube vents and
oiler assembly for oil lubricated units. Connect discharge
piping and suction piping, if required. Make sure to install
gaskets on the flanged connections. On Model 342A pumps
replace plugs (74 and 75) in base elbow (73).
14. Read carefully the section of the manual titled INSTALLA-
TION, especially those paragraphs referring to pump and
coupling alignment.
15. Connect electricity to the motor.
STARTING PUMP AFTER REASSEMBLY
Do not start pump until all air and vapor has been bled and until
making sure that there is liquid in the pump to provide the nec-
essary lubrication. Without the fluid around it, the seal may be
ruined in a few seconds of operation. It is possible that the
mechanical seal may drip during the first few minutes to one
hour of operation.
Warning: Electrical Shock Hazard
All electrical connections are to be made by a qualified elec-
trician in accordance with all codes and ordinances. Failure
to follow these instructions could result in serious personal
injury, death or property damage.
Warning: Electrical Overload Hazard
Insure all motors have properly sized overload protection.
Failure to follow these instructions could result in serious
personal injury, death or property damage.
Warning: Sudden Start-Up Hazard
Disconnect and lockout power source before servicing.
Failure to follow these instructions could result in serious
personal injury, death or property damage.
Warning: Hot Surface Hazard
If pumping hot water, insure guards or proper insulation is
installed to protect against skin contact to hot piping or
pump components. Failure to follow these instructions could
result in serious personal injury, death or property damage.
Warning: Spraying Water Hazard
When servicing pump replace all gaskets and seals. Do not
re-use old gaskets or seals. Failure to follow these instruc-
tions could result in serious personal injury, death or proper-
ty damage.