


-3-
PARKING LIGHT FLASHER:
This system provides an output to control an optional parking light flasher relay (not included).
When this option is installed, the vehicles parking lamps will flash during arm, disarm, intrusion, and emergency panic.
This is a ground (300 mA maximum) output, therefore, a relay must be used to take advantage of this feature.
STARTER DISABLE:
This system provides an output to control an optional starter cut relay (not included).
When this option is installed, any time the system is armed, the vehicles starting circuit is inoperable.
TRANSMITTER PROGRAMMING:
The transmitters included in this kit have been programed at the factory for the Channel 1 (Lock /Arm, Unlock/Disarm,
and panic function) only.
Any additional functions of the system (receiver Channels 2 and 3) must be programed at the time of installation. These
functions can be assigned to the Option transmitter button, or a simultaneous press of the Lock/Unlock/ and Option
buttons.
Refer to the transmitter programming guide, included in this package, for more details regarding transmitter button
assignments and system functions.
INSTALLATION HOT LINE:
If at any time during the installation you require technical assistance, call toll free 1-800-225-6074 for the Audiovox
Installation Hot Line.
MOUNTING THE COMPONENTS:
CONTROL MODULE:
Select a mounting location inside the passenger compartment ( up behind the dash ), and secure using two screws
provided.
The control module can also be secured in place using cable ties.
Do not mount the control module in the engine compartment, as it is not waterproof. You should also avoid mounting
the unit directly onto factory installed electronic components. These components may cause RF interference, which
can result in poor transmitter range or intermittent operation.
VALET SWITCH:
Select a desired mounting location for the switch, that is easily accessible to the driver of the vehicle.
The switch does not have to be concealed, however, concealing the switch is always recommended, as this provides
an even higher level of security to the vehicle. The switch may be mounted in the dash by drilling a 1/4" diameter hole
in the location. Be sure to check behind the dash for adequate clearance for the body of the switch, and to confirm that
the drill will not damage any existing components as it passes through the dash.
Make certain the back of the switch is accessible for wiring later in the installation.
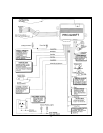
WIRING THE SYSTEM:
RED w/ WHITE FUSED WIRE : + 12 VOLTS CONSTANT BATTERY SOURCE
Connect the Red w/ White tracer wire to a + 12 VDC constant battery source.
BLACK WIRE: CHASSIS GROUND
Connect this wire to a solid, metal part of the vehicle’s chassis.
Do not confuse this wire with the thin black antenna wire that exits the control module independently.
YELLOW WIRE: + 12 VDC IGNITION SOURCE
Connect this wire to a source that is hot when the key is in the on and start positions, and off when the key is in the off
position.