


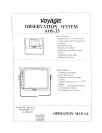


AOS.33 Operations Manual
BEFORE IN5TALLATtON:
1. This system operates from 10 volts DC to 38 volts DC, negative ground
2. Please install this system according to the instructions in this manual.
3. Do not disassemble the camera or the monitor. This voids the warranty Disassembling the camera Will
compromise the waterproof sea!
4. Connect the system to an ignition switched power source. Connection to a battery source will reduce battery life
**WARNING**
, .It) pTeve"1 e\~t:.1f\C'd\ "'\)t)C". DO NO'. oPEN '.HE tAON\TOR CA-SE. There are potentially lethal "Qltage~ in~ide the
monitor. There are no user serviceable parts inside. If evidence of tampering is detected, the warranty will be
considered void.
2. Keep monitor away from leaking water, rain, moisture etc, It is NOT waterproof, Any moisture inside the monitor
could cause extensive damage,
~. Use \ne \numbscrews \0 moun\ \he rT1on'l\or to bracket,
**CAUTION**
'\ .DO NOT OPEN THE CAMERA CASE. This will break the camera's waterproof seal. If evidence of tampering is
detected. the warranty will be considered void.
2. Do not molJnt the camera near the lower area of the vehicle (e.g. Bumper). This reduces the view of the camera
and may cquse physical damage to tne camera
3. Use only the M4x8 bolts and washers to mount the camera
INSTALlATION INSTRUCTIONS
Acc.rs CAMERA
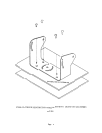
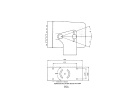
1 .Attach camera bracket (See Fig 1) to upper portio~ of vehicle. Attachment point must be s'urd)' enough 'I:> suppon
camera and bracket.
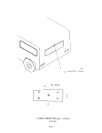
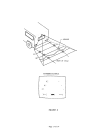
2- Att~ch camera to bracket using M4x8 bolts provided. Adjust angle as indicated in figure 2 (Use rear bumper and
back of vehicle as a reference point
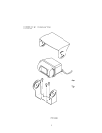
~. W\tld dei\ectof ma~ 00 \m\a\\~.I"is Ue"~I:;\Of is desig"~d \0 r~t\ut:.e \ne bIJi\6 up 0\ du\;\, d\rt and mo\S\uTe
on the camera lens (See Fig 3).
AOM.70 MONiTOR
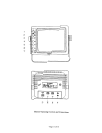
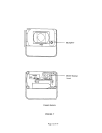
1. Att'i1ch monitor ins\;je veh\cle in a location conven\£!nt to the dri~er (e.g. center of dash, overhead or in dash). (See
Fig 4)
2. Use a compression plate l!) attech the monitor bracket to the dash or overhead (See Fig 4).
3. Adjust !T\ounting a!)gle of the monitor to allow driver to easily view the screen from all seat positiOn$ (See Fig .5) .
4. If necessary, snap sun visor into groove on front face of monitor. Press a\l (4) sid£!s of the visor to ~nap it into pl-ace
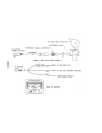
AOC-80 CABLE
1. The camera-to-cable connection ia waterproof. The cabJe-to-monitor connection is not waterproof. Be SlJre to
orient the cable pr()perly. The cylindrical end attaches to the camera. The rectangular box end attaches to the
monitor. (See figure 6)
2. Do not run the AOC-80 cable over sharp edges or corners. Do not kink the cable. Keep the cable away from hot
and rotating parts.
3. Place all exces-s c-able in convolut~d tubinfJ
4. Wire tie the cable securely.
Page 2 of 14