


2 3
INSTALLATION
INSTALLATION LOCATION RECOMMENDATIONS
Thermostat should be mounted:
• On an interior wall, in a frequently occupied space.
• Approximately 5‘ above floor.
• At least 18” from outside wall.
• Thermostat can be mounted to a vertical junction box.
Do not mount thermostat:
• Behind doors, in corners or other dead air spaces.
• In direct sunlight, near lighting fixtures, or other
appliances that give off heat.
• On an outside or unconditioned area wall.
• In the flow of a supply register, in stairwells, or near
outside doors.
• On a wall with concealed pipes or ductwork.
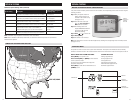
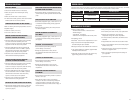
OUTDOOR TEMPERATURE SENSOR (INCLUDED)
Heat pump models can use the outdoor temperature to effectively utilize the heat pump:
• When the outdoor temperature is less than the Low Balance Point, the heat pump will be locked out and only
auxiliary heating will be used.
• When the outdoor temperature is higher than the High Balance Point, the auxiliary heating will be locked out and
only the heat pump will be used to provide heating.
Indoor Air Quality functions can use the outdoor temperature sensor to:
• Control humidification setpoint based on outdoor temperature to prevent condensation
• Lock out humidification for temperatures over 60°F or below -30°F.
• Lock out ventilation based on high and/or low outdoor temperatures.
• Display outdoor temperature on thermostat.
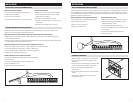
Outdoor temperature sensor should be mounted:
• On side of building out of direct sunlight (north side recommended).
• Above snow line.
• At least 3’ away from exhaust vents and condensing lines.
• Using less than 300’ of wire.
• Do not route wires along 120 VAC lines.
T2T1
S1
CI2
L
S2
W2
R
RC
W
I1
O/B
Y
Y2
G
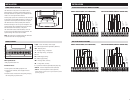
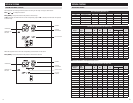
REMOTE TEMPERATURE SENSOR (OPTIONAL)
A remote temperature sensor can be used if the thermostat has to be mounted in a concealed location. A 8051 flush
mount or 8053 surface mount remote temperature sensor can be attached to the T1 and T2 terminals and mounted
in a recommended area. The remote sensor must be enabled in the installer setup menu. When the remote sensor is
installed it overrides the internal sensor.
Do not mount remote sensor:
• Behind doors, in corners or other dead air spaces.
• In direct sunlight, near lighting fixtures, or other
appliances that give off heat.
• On an outside or unconditioned area wall.
• In the flow of a supply register, in stairwells, or near
outside doors.
• On a wall with concealed pipes or ductwork.
• Near 120 VAC lines.
T2T1
S1
CI2
L
S2
W2
R
RC
W
I1
O/B
Y
Y2
G
Outdoor temperature can be measured by attaching the included 8052 sensor to the S1 and S2 terminals. The
outdoor sensor must be enabled in the installer setup menu.
Remote temperature sensor should be mounted:
• On an interior wall, in a frequently occupied space.
• Approximately 5‘ above floor.
• At least 18” from outside wall.
• Using less than 300’ of wire.
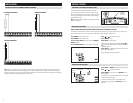
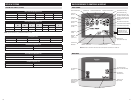
THERMOSTAT MOUNTING
1. Remove the rear mounting plate from the thermostat.
2. Pull wires through the opening on the back of the
thermostat.
3. Position and level the mounting plate of the thermostat
on wall and mark the hole locations with a pencil.
4. Drill 1/4” holes and insert supplied anchors
(drywall only).
5. Place mounting plate over anchors, insert and tighten
screws.
6. Seal wire entry holes to prevent drafts affecting
temperature readings.
INSTALLATION