5
H
ARDWARE
I
NSTALLATION
G
UIDE
2.1
R
EMOVING THE
L
EFT
P
ANEL
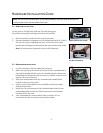
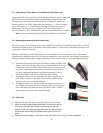
Lay the case on its right side, with the I/O panel facing you.
You will be removing the left panel (the one with the fan)
1. Remove the two screws from the rear of the panel.
2. Remove the panel, making sure to lift the back portion first. If this is
the first time you are opening the case, remove the drive cable
bundle and tool bag from the inside of the case and set them aside.
Note: Do not use your fingernails to pry or lift the panels.
2.2
M
OTHERBOARD
I
NSTALLATION
1. Lay the case down, with the open side facing up.
2. Make sure you have the correct I/O panel for your motherboard. If
the panel provided with the case isn’t suitable, please contact your
motherboard manufacturer for the correct I/O panel. Install the I/O
panel at the rear of the case.
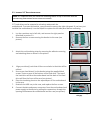
3. Align your motherboard with the motherboard standoff holes
located at the rear of the case.
4. Screw in your motherboard to the standoffs with the provided
Phillips-head screws.
5. Attach the 24-pin connector of the included cable bundle to the
motherboard and connect the 18-pin connector to the already
installed PCB in the case.
6. Your motherboard is now installed. Refer to section 3.1 for
instructions on how to connect the I/O panel cables.
Note:
Do not install the stand prior to installing hardware. You will need to remove the
stand in order to access the inside of the case.
Remove these case screws
Lift the back up first
Motherboard screw locations


