


FORM NO. 56041580 - Captor
™
4300, 4800, 5400 / CR 1100, 1200, 1400 - A-19
ENGLISH / A-19
SWEEPING
Follow the instructions in preparing the machine for use section of this manual.
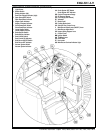
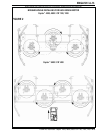
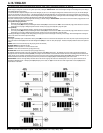
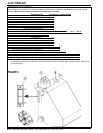
1 While seated on the machine, adjust the seat and steering wheel to a comfortable operating position using the adjustment controls (51)
and (NN).
2 Release the Parking Brake (GG). To transport the machine to the work area, apply even pressure with your foot on the front of the Drive
Pedal (OO) to go forward or the rear of the pedal for reverse. Vary the pressure on the foot pedal to obtain the desired speed.
3 Push the Lower Hopper Switch (V) to make sure the hopper is seated properly.
4 Move the Main Broom Lever (II) to the SWEEP (middle notch) position to lower and enable the main broom. NOTE: The dump door
opens automatically when the main broom (II) is lowered and closes when the broom is raised.
Use the FULL FLOAT (last notch forward) position only when sweeping extremely rough or uneven oors. Use at other times will only
increase broom wear.
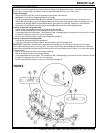
5 When sweeping dry oors, push the Dust Control Switch (X) to turn ON the dust control system.
When sweeping oors with puddles, push the Dust Control Switch (X) to turn OFF the dust control system before the machine enters a
puddle. Turn the dust control system back ON when the machine is back on completely dry oor.
When sweeping wet oors, keep the Dust Control Switch (X) OFF at all times.
6 Lower the Side Broom(s) (N) when sweeping along walls or curbs. Raise the Side Broom(s) (Y) when sweeping in open areas. Push
and hold the Side Broom ON/DOWN Switch (N) to lower and start the side broom motor(s). NOTE: Hold the switch until the side
broom(s) have lowered to the desired level. Side broom sweeping pattern is adjusted by pushing switches (N & Y) until the desired
amount of down pressure is achieved. NOTE: If the side broom(s) were not raised and turned OFF after last use, they will automatically
lower and turn ON when the main broom is lowered and starts.
7 Drive the machine straight forward at a quick walking speed. Drive the machine slower when sweeping large amounts of dust or debris
or when safe operation dictates slower speeds. Overlap passes 6 inches (15 cm).
8 If dust comes out of the broom housing while sweeping, the Dust Control Filter (19) may be clogged. Push the Shaker Switch (Q) to
clean the dust control lter. The dust control system (X) will automatically turn OFF while the shaker is running and turn ON after the
shaker turns OFF (the shaker runs for 20 seconds).
9 Check behind the machine occasionally to make sure that the machine is picking up debris. Dirt left behind in the path of the machine
usually indicates that the machine is moving too fast, the broom needs to be adjusted, or the hopper is full.
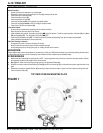
EMPTYING THE HOPPER
1 Push the Shaker Switch (Q) to remove excess dirt from the dust control lter. SERVICE NOTE: For best shaker performance always
run the shaker with the hopper fully down.
2 Drive the machine close to a large trash receptacle and hold the Raise Hopper Switch (W) until the hopper is all the way up. NOTE:
The dump door automatically closes when switch (W) is pushed. You regain control of the dump door as soon as the hopper begins to
raise so you can dump at any height if necessary.
3 Move the machine forward until the hopper is over the receptacle, then press the Open Dump Door Switch (R) to open the dump door
and empty the hopper.
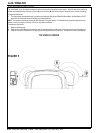
4 Check the back of the hopper and the front of the broom housing. Use a broom, if necessary, to remove litter from these areas. The
back of the hopper must seal tightly against the front of the broom housing for proper operation.
5 Back the machine away from the receptacle until the hopper will clear it, and then lower the hopper (V). NOTE: The dump door will
automatically open when sweep function is resumed.