


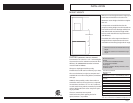

INSTALLATION
Mounting the Range Hood
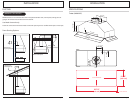
1. Determine and mark the mounting
position of the range hood with a pencil.
2. Cut out the opening where the range
hood will be installed.
3. Cut out wall or ceiling area for clearance
of ductwork. Install ductwork prior to
range hood.
4. Determine location for the power
supply cable. After drilling access hole,
rout the cable into the electrical box
of the range hood. Secure with a cable
lock and connect to range hood
electrical system.
5. Position range hood into location and
ensure spring locking clip has locked
into position.
6. Fasten wood screws into wood frame
opening via the long side. Wood blocking
may be necessary if wood frame is too thin.
ELECTRICAL
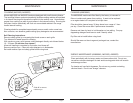
Locking clip
Controls
Power supply cable
Entry into range hood
Ductwork
All Electrical work must by performed by qualied electrician or person with similar technical
know how and background.
For personal safety, remove house fuse or open circuit breaker before beginning installation.
Do not use extension cord or adapter plug with this appliance.
Follow National electrical codes or prevailing local codes and ordinances.
Electrical Supply:
This appliance requires a 120V 60Hz electrical supply., and connected to an individual, properly
grounded branch circuit, protected by a 15 or 20 ampere circuit breaker or time delay fuse. Wiring
must be 2 wire w/ ground. Please also refer Electrical Diagram labeled on product.
Cable Lock:
A cable locking connector (not
supplied) might also required by
local codes. Check with local
requirements and codes, purchase
and install appropriate connector if
necessary.
Cable Lock
WARNING
Page 6
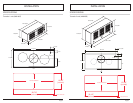
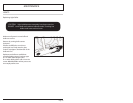
Front View
Attach 2 screws to each
long side of AK8100/AK8200
Side View
wood
blocking
wood frame
wood frame
wood frame
wood frame
INSTALLATION
Page 7
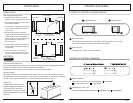
CONTROLS & FEATURES
CONTROLS & FEATURES (AK8100S/AK8200S)
CONTROLS & FEATURES (AK8000AS)
Speed Selection
1
Lights On/O
2
Lights On/O
Speed Selection
2
1
This switch controls the speed of the blower. The rst position is low speed,
the second is medium speed, and the third is high speed.
Turn lights on or o by moving this switch.
Speed Selection
1
Lights Bright / Dim / O
2
This switch controls the speed of the blower. I is low speed,
I I
is medium speed, and I I I is high speed.
This switch controls the lights. Slide switch to I
for dim lighting and I I for bright lighting,.
III II I 0 II I 0
Lights Bright / Dim / O