


035-19992-001 Rev. A (0404)
6 Unitary Products Group
To remove the filter you must do the following:
1. Before proceeding, be sure the area is well ventilated. Follow
instruction “To turn off the appliance”. Check all metal parts and
surfaces to be sure they have cooled to room temperature before
you begin.
2. Remove the door by removing the retaining screw(s), if provided.
3. Remove the air filter by pulling on it. The air filter will slide out of
the rack.
4. Replace throw away filter(s)) with the same size new filter(s).
Throw away filter(s)) may be replaced with cleanable filter(s) at
this time. Cleanable filter(s) may be cleaned as described in the
manufacturer instructions or as described in these instructions.
To replace the filter after cleaning you must do the following:
5. Slide filter into place. If the filter has been cleaned, make sure it is
dry before re-installing it.
6. Replace the door or cover panel and tighten the retaining screws,
if provided.
7. Make sure the door is secure to the end of the filter rack and
sealed to prevent leaks.
8. Follow the Operating Instructions to place the furnace back in
operation.
How to Clean your Filter
High-velocity filters may be cleaned with a vacuum cleaner or washed
with a garden hose. Be sure to shake off excess water and allow filter to
completely dry before re-installing the filter.
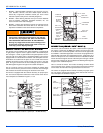
Blower Care
Even with good filters properly in place, blower wheels and motors will
become dust laden after long months of operation. The entire blower
assembly should be inspected annually. If the motor and wheel are
heavily coated with dust, they can be brushed and cleaned with a vac-
uum cleaner. If the blower cannot be properly cleaned without removing
it from the furnace, then call a qualified service agency. Only a qualified
service agency can perform this service.
Motor Lubrication
The motors in these furnaces are permanently lubricated, and do not
require periodic oiling.
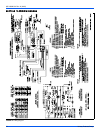
SECTION II: SERVICE AND MAINTENANCE
MANUAL
SAFETY SECTION
This section has been designed to assist a qualified service agency in
performing service and maintenance on this appliance. The homeown-
ers and/or end user must never attempt to perform any service or main-
tenance on the appliance especially when it involves the removal or
adjustment of any parts and/or components.
The following safety rules must be followed when servicing the
furnace.
FURNACE MAINTENANCE SECTION
The furnace should be cleaned and adjusted by a certified dealer or
qualified service contractor once a year or before the start of every
heating season. The following items must be cleaned and serviced or
replaced if there are signs of deterioration.
1. The vent terminal screen (if applicable).
2. The furnace vent and combustion air intake passageways. Should
it be necessary to service the vent/air intake system, the manufac-
turer recommends this service be conducted by a qualified service
agency. The operation of this appliance requires the reassembly
and resealing of the vent/air intake system.
3. The furnace burners, ignitor and flame sensor.
FURNACE CLEANING SECTION
NOTE: The cleaning operations listed below must be performed only by
a qualified service agency.
Burner Removal/Cleaning
The main burners should be checked periodically for dirt accumulation.
If cleaning is required, follow this procedure:
1. Turn off the electrical power to the unit.
2. Turn off the gas supply at the external manual shut-off valve and
loosen the ground union joint.
3. Remove the upper access panel.
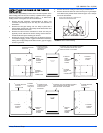
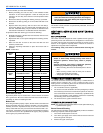
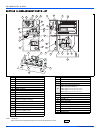
TABLE 1:
Filter Sizes
Cabinet
Size
Side Return Bottom/End Return
in. cm in. cm
B 25 x 16 64 x 41 24 x 15 61 x 38
B 25 x 16 64 x 41 24 x 15 61 x 38
C 25 x 16 64 x 41 24 x 15 61 x 38
C 25 x 16 64 x 41 24 x 15 61 x 38
D (2) 25 x 16 (2) 64 x 41 24 x 21 61 x 53
D (2) 25 x 16 (2) 64 x 41 24 x 21 61 x 53
D (2) 25 x 16 (2) 64 x 41 24 x 21 61 x 53
Cabinet
Size
Top Return (Downflow)
Cleanable Air Filters
Top Return (Downflow)
Disposable Air Filters
in. cm in. cm
B 14 x 20 (2) 25 x 51 (2) 10 x 20 (2) 25 x 51
B 14 x 20 (2) 25 x 51 (2) 10 x 20 (2) 25 x 51
C 16 x 20 (2) 41 x 51 (2) 16 x 20 (2) 41 x 51
C 16 x 20 (2) 41 x 51 (2) 16 x 20 (2) 41 x 51
D 20 x 20 (2) 51 x 51 (2) 20 x 20 (2) 51 x 51
D 20 x 20 (2) 51 x 51 (2) 20 x 20 (2) 51 x 51
D N/A N/A N/A N/A
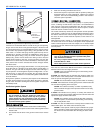
Make sure you DO NOT move the clip on weight on the
indoor fan wheel when cleaning the wheel. This weight is
used to balance the wheel. Moving the weight will cause
the fan wheel to vibrate.
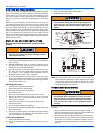
ELECTRIC SHOCK, FIRE OR EXPLOSION HAZARD
Failure to follow safety warnings exactly could result in
dangerous operation, serious injury, death or property
damage.
Improper servicing could result in dangerous operation,
serious injury, and death or property damage.
• Before servicing, disconnect all electrical power to the fur-
nace.
• When servicing controls, label all wires prior to discon-
necting. Reconnect wires correctly.
• Verify proper operation after servicing.