


035-13606-003 Rev. A (202)
Unitary Products Group 5
RE-ASSEMBLING, BRAZING AND CLEANING OF
JOINT CONNECTIONS
Remove the Schrader Valve cores from the service valves.
Remove the plugs from the service valve field tubing connec-
tions. Clean the joints to be brazed.
NOTE: Do not overheat the connection to be brazed as this
can cause improper flow of solder, resulting in a weak and
leaking joint. Never apply heat directly to face of fitting. Do
not heat solder by direct contact with flame of the torch.
When brazing copper tubing it is very important to preheat
the entire joint before applying the solder. This is done by
sweeping the flame steadily and evenly around the fitting, to
bring both fitting and tubing up to equal temperature before
applying the solder.
Reassemble groups of tubing and fittings, brazing several
joints instead of one joint at a time. This reduces the chance
for error in the alignment of the assembly. Replace Schrader
Valve cores. DO NOT OPEN SERVICE VALVES AT THIS
TIME.
Clean joint connection immediately after brazing with wet rag.
REFRIGERANT LINE SUPPORT
Refrigerant lines should be supported in a way that no dips or
sags occur. We recommend four feet between supports. If
refrigerant lines are to be attached to the home structure,
care should be taken to eliminate the transmission of vibra-
tions. Attach the refrigerant lines to the indoor coil first.
Remove plugs from the indoor coil, then clean joints to be
brazed. Braze refrigerant lines to the indoor coil. Attach refrig-
erant lines to the outdoor unit.
CHARGING AND LEAK TESTING
On systems with or without service valves the refrigerant
should be recovered or recycled in accordance with EPA reg-
ulations. In some cases this may require putting piercing
valves on both the high and low sides of the system.
When recovering refrigerant from a system, with a burnout,
follow a safe procedure due to possible contamination.
Contaminated refrigerant must be recovered and returned to
the local refrigeration supply house for proper disposition.
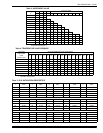
TOTAL LINE LENGTH
Units should be installed only with approved system combina-
tion (indoor/outdoor) as specified in the Technical Guide.
For systems with total line length exceeding 50 feet, see
APPLICATION DATA and work sheet "General Piping Rec-
ommendations and Refrigerant Line Length" for vapor and
liquid line sizing, calibration of liquid line pressure loss or
gain, determination of vapor line velocity, elevation limita-
tions, orifice connections, system charging, traps, etc.
Systems with liquid line pressure loss or gain greater than 11
psi must be provided with corrected orifice size as noted in
.APPLICATION DATA.
ORIFICE SELECTION (ON SWEAT FIT COILS)
NOTE:
The proper orifice must be installed in the indoor coil
liquid line connection prior to the connection of the refrigerant
lines.
The orifice shipped with the outdoor unit is based on the
“most sold” combination, but it may be changed, depending
on the capacity and efficiency of the outdoor unit, elevation
differences, and/or long total line lengths. An additional ori-
fice(s) is shipped with most outdoor units for the most com-
monly required replacement combinations. Other sizes must
be ordered from Source 1 Parts if required.
See the appropriate Tabular Data Sheet for the correct orifice
size and charge adder. If the orifice size matches, nothing fur-
ther is required and the refrigerant lines may be connected
per the outdoor unit instruction. However, if another orifice
should be used, see the coil instruction for details to change
the orifice in the coil.
When using hard solder, an inert gas such as dry
nitrogen must be introduced and permitted to
flow through tubing during brazing to displace air
and prevent oxidation.
DO NOT vent refrigerant to the outdoors.
Avoid getting the refrigerant in the eyes or on the
skin.
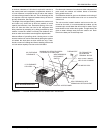
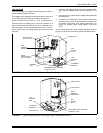
Coil is under 30 to 35 psig (inert gas) pressure.
Each coil has an orifice installed in the fitting
between the liquid line connection and distributor.
The orifice is identified on a label next to the liq-
uid line connection.