


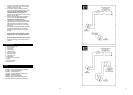

3. To remove the impeller, unscrew the central
screw with a 7mm nut runner and remove it,
place the screw to one side.
4. To clean the impeller, either wipe it with a
damp, lint free cloth or wash it in warm soapy
water. Do not use strong detergents or
chemical cleaners.Thoroughly dry the
impeller and refit. Replace the screw ensuring
that it is securely fitted.
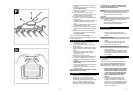
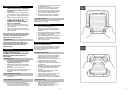
5. Clean the back draught shutter and grille in
warm soapy water. Do not use strong
detergents or chemical cleaners.
6. Thoroughly dry the back draught shutter and
grille and refit the back draught shutter to the
grille by placing into position and pushing
down until it clicks into position, see Fig. G3
and Fig. G4.
7. Refit the back draught shutter/grille assembly
by sliding the grille back over the release
catches, the catches will locate and secure
the grille.
Do not immerse the fan in water or other
liquids to clean any other parts of the fan.
Never use strong solvents to clean the fan.
Apart from cleaning, no other maintenance is
required.
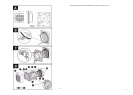
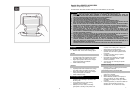
1. Back draught shutter.
2. Fan assembly.
3. Outer grille.
4. Ladder strips.
5. Terminal cover.
6. Trickle vent catch.
7. Rear cable entry.
8. Top cable entry.
9. Rating plate.
10. Lugs for screw mounting.
11. Grille.
12. Screw hole caps.
13. Actuator lever.
40984SK – Wax Actuator
41004SK – Actuator Linkage Assy (GX6 EC2)
41010SK – Outer Grille Assembly
41785SK – Ladder Strip Kit 3”
41791SK – Cord Actuator Assy (GXC6 EC2)
41904SK – Impeller Assembly
41905SK – Front Cover Assembly
41906SK – GX6 EC2 Motor/Duct Assembly
41907SK – GXC6 EC2 Motor/Duct Assembly
Components, Fig. D.
10
Spares
3