


08905108C - 2 -
INSTRUCTIONS
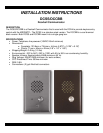
The DCSS/DCCBB is designed to be flush mounted into a standard single gang Rough-In box with a
minimum inside dimension of 1.70” deep x 2.00” wide x 2.84” tall.
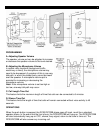
A. New Construction Flush Mounting
Step 1. Front of box should stick out approximately ½" from front surface of wall stud (this may vary
depending on the walls sheathing and siding thickness).
Caution: Rough-In box must be mounted LEVEL and must NOT stick out beyond the front surface of
siding.
Step 2. To maintain a vapor barrier on outside wall applications, caulk around the box, filling any
gaps between the box and the rough opening. Apply caulk to any holes in the box around wires, etc.
Step 3. When installing siding cut a hole just large enough for the Rough-In box opening.
Caution: Too large of a hole can cause plate misalignment and compromise the gasket seal.
Note: When mounting to 4 inch or less horizontal lap siding, the unit can be mounted horizontally
flush against siding or a siding mounting block can be used (recommended with vinyl siding). Contact
siding installer for the correct mounting block.
B. Old Work / Remodel Flush Mounting (Recommended Rough-In box: Allied Molded 9331)
Step 1. Make sure mounting location is free of wall studs, wires, etc.
Step 2. Place Rough-In box LEVEL against siding. Trace outline of box onto siding.
Note: When mounting to 4 inch or less horizontal lap siding, the unit can be mounted horizontally
flush against siding or a siding mounting block can be used. Contact your siding Installer for the
correct mounting block part number.
Note: A siding mounting block is recommended when mounting to vinyl siding.
Step 3. Cut a hole through the siding and wall sheathing just large enough for the rough-in box.
Caution: Too large of a hole can cause plate misalignment and compromise the gasket seal.
Step 4. The front surface of the Rough-In box can be mounted flush against wood siding or can be
recessed and mounted flush against wall sheathing when mounting on aluminum, steel or vinyl
siding.
Step 5. When mounting to 5/8 inch thick or less wall sheathing the two attached screws with wing
brackets can be used to secure the rough-in box. When mounting to surfaces thicker than 5/8 inch,
four standard flat head dry wall screws can be used to secure the Rough-In box through its mounting
ears.
Step 6. To maintain a vapor barrier on outside wall applications, caulk around the box, filling any
gaps between the box and the rough opening. Apply caulk to any holes in the box around wires, etc.
WARNING: Do not use a “Wet Location Box”