


MAINTENANCE
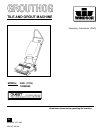
GROUTHOG 86038000 05/17/07
5
Do not overheat block as
this will damage the bearing.
DAILY MAINTENANCE
1. Before storing the machine, clean exterior.
Remove brush and rinse clean with hot water.
2. Periodically inspect electrical cable and
connections. Because the cable will lie on wet,
abrasive floors, the cable must be well insulated.
If the insulation is broken or frayed, repair or
replace immediately.
3. Remove wheels periodically and apply silicone
lubricant to the axle.
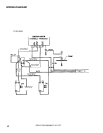
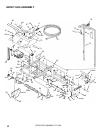
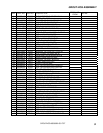
SERVICING THE GROUTHOG
Always disconnect the
power cord from electrical
source before making repairs or adjustments.
BRUSH REMOVAL
1. Place handle in upright position. Tilt machine
back with handle resting on floor.
2. Loosen Knob Assembly (item 20) holding the left
bearing block (item 29).
3. Remove bearing block from the frame and brush
core.
4. Remove brush (item 33) from the right bearing
block (item 38). When re-installing the brush,
make sure that the guide pins (item 30) on both
ends are properly aligned with the holes in the
brush core and the bearing block (items 29) is
correctly seated.
BELT REPLACEMENT
1. Remove main cover (item 73 held on by (4)
screws). Remove bottom belt guard (item 34
held on by (2) screws).
2. Using an allen wrench, remove the screw holding
the right bearing block (item 56).
3. Remove bearing block along with the old belt.
Replace belt and bearing block. Check belt for
proper tension and alignment (see Motor
Replacement for belt adjustment).
BEARING REPLACEMENT
Using a small torch, heat the aluminum bearing block
just enough to allow the bearing and shaft (items 31
and 32, respectively) to be removed.
Use a bearing puller to remove old bearing. When
replacing bearing, use a socket or metal sleeve just
large enough to slip over the shaft and still contact
the inner bearing race. Use an arbor press or vise to
press new bearings on shaft. Re-heat aluminum
block just enough to allow re-assembly of bearing
and shaft.
MOTOR REPLACEMENT
1. Remove motor cover (item 73 held on by (4)
screws).
2. Remove (4) screws holding motor (item 60).
Disconnect motor lead and remove motor.
3. When re-installing the motor use a straight edge
to realign pulleys. A screw driver can be used to
adjust tension.
4. NOTE: Belt should be adjusted to snug fit to
prevent slipping. DO NOT OVERTIGHTEN.