


7
6
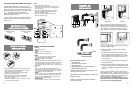
6) The air conditioner can now be plugged into a 110-
120V/60Hz dedicated 15amp or greater circuit. You are
advised not to use an extension cord, however, if this is
unavoidable, the extension cord must be 14 gauge,
grounded at both ends and not more than 30 feet long.
If you need to extend your exhaust hose, it may be
extended 5 feet only. Using a 5 foot, 4 inch diameter PVC
pipe (available at your local hardware store), you must cut
the exhaust hose in half and duct tape the PVC pipe in
between the two cut pieces of the exhaust hose for a
maximum exhaust length of 10.9 feet. Flex ducting is also
recommended for extending the exhaust hose. DO NOT
USE ALUMINUM TYPE EXHAUST HOSE TO LENGTHEN
THE EXHAUST.
The compressor is an essential component of the
appliance for producing cold air. This appliance is fitted
with a thermal protection device which allows the
compressor to be started only after a time delay of up to
three minutes.
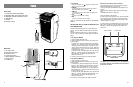
BEFORE OPERATING THE UNIT, BE SURE THE
DRAIN PIPE IS CAPPED WITH THE DRAIN PLUG.
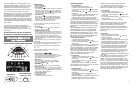
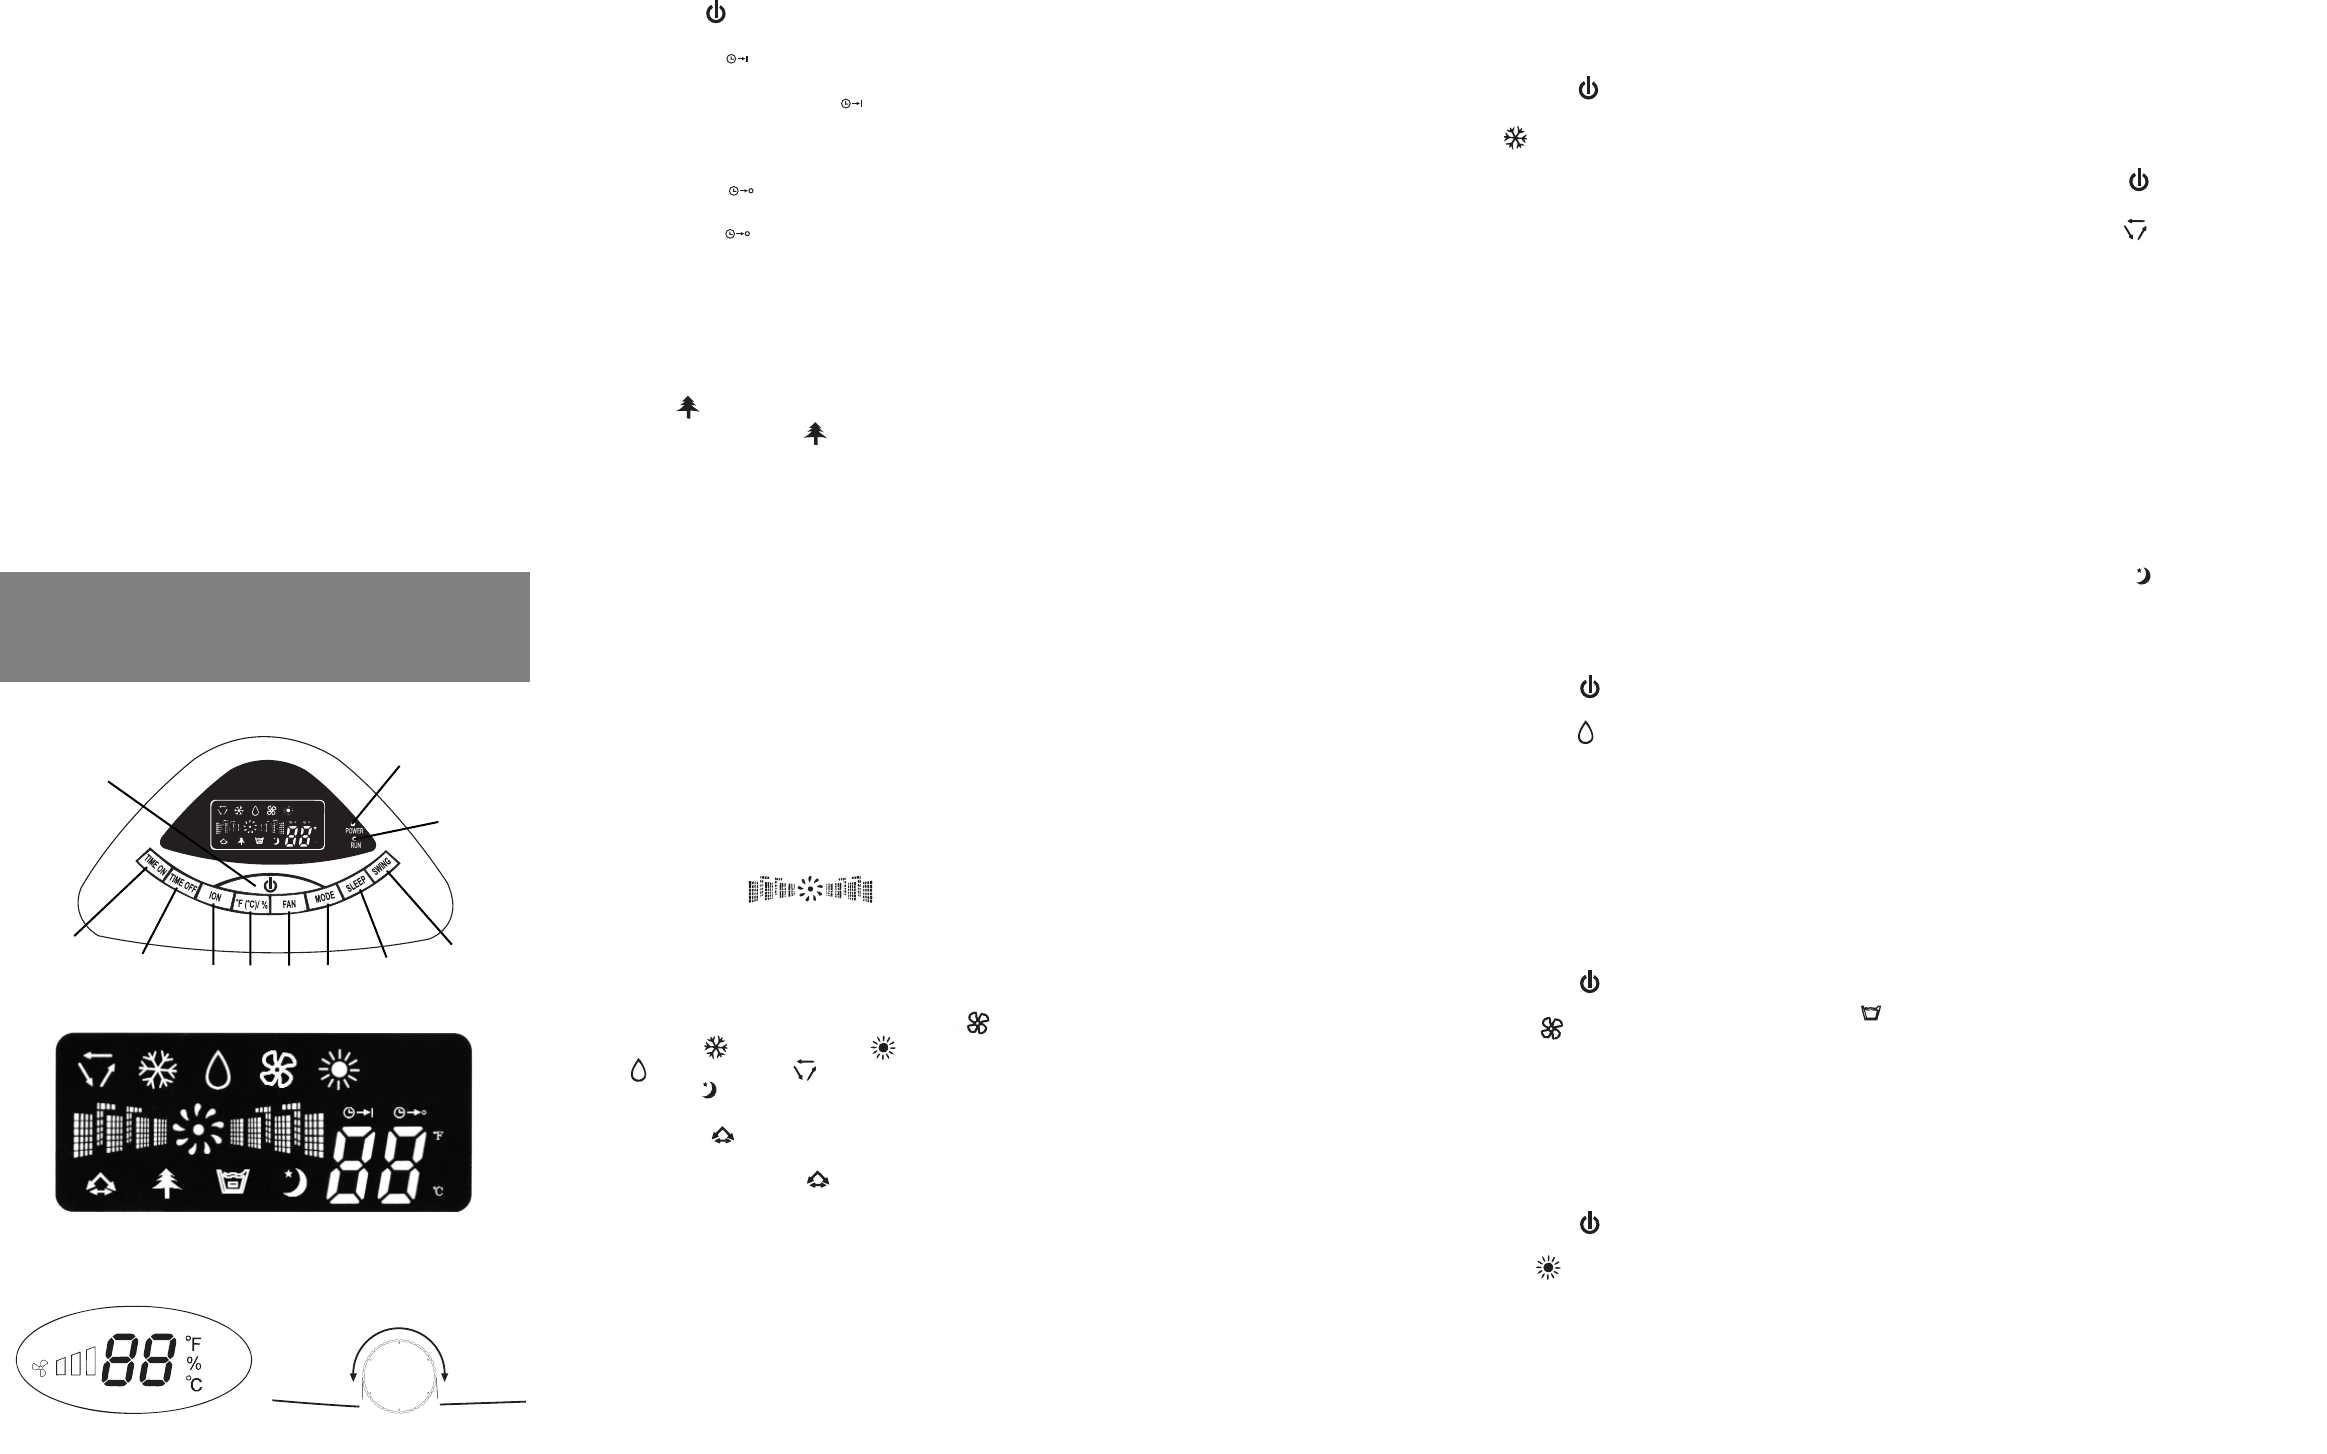
Control Panel
1) Power On/Off
Starts or Stops the Unit
2) Time On Button
To program the timer, press Timer On button until the Main
LED display shows a flashing ‘ ’. Turn the adjustable
dial switch to change the timer to the desired time for the
unit being turned on. Turn clockwise for increase in time
and counter cloclwise for decrease in time.
3) Time Off Button
Press Timer Off button and the Main LED display will
show a flashing ‘ ’. Turn the adjustable dial switch to
change the clock to the desired time for the unit being
turned off. Turn clockwise for increase in time
and counter cloclwise for decrease in time.
The light will flash for 3 seconds to activate the timer you
have just programmed.
4) Ion Button
Press the Ion Button until ‘ ’ appears on Main LED
display, press again to stop.
5) Temperature/ Humidity Button
To display temperature or humidity on both the Main LED
and LED Display. Hold the button more than 3 seconds, to
convert the temperature display from Fahrenheit (
o
F) to
Celsius (
o
C) and vice versa. To adjust the desired
temperature setting turn the Adjustable Dial clockwise for
increase of temperature or counter clockwise for decrease
of temperature.
NOTE: This function can only be used while in cooling and
heating mode.
Press the button less than 3 seconds, to convert the display
from humidity to room temperature and vice versa.
The room temperature display range is from 32
o
F- 99
o
F
(0
o
C- 37
o
C) .
NOTE: The display temperature may differ from actual
temperature by ±4
o
F ( ±2
o
C )
6) Fan Speed Button
Select the fan speed desired: High, Medium or Low
The fan speed can be visually distinguished by the speed
of the digital air segments progressing out from the
windmill fan image on the Main LED display.
7) Mode Button
Select the functions of the unit for: Fan Mode ,
Cooling Mode , Heating Mode , Dehumidifying
Mode and Auto Mode .
8) Sleep Button
Press to select the function of the unit for Sleep Mode.
9) Swing Button
To start swinging air louvers horizontally by press SWING
Button once. The symbol, ' ' will appear on the Main
LED display. To stop, press SWING again. Vertical air flow
direction can be adjusted manually.
10) Power Indicator Light
Indicates the unit is on.
11) Run Indicator Light
Indicates the unit is in working mode
Operating Functions
1) Cooling Operation
a) Install the exhaust ducts properly.
b) Plug the Power Cord to the power outlet.
c) Turn on the unit by pressing the ' 'Button on the
control panel.
d) Press Mode Button until ‘ ‘ appears on the Main
LED display
e) Turn the adjustable dial switch until the desired room
temperature appears on the LED. The desired
temperature range is from 61
o
F-88
o
F (16
o
C-31
o
C).
f) Select the fan speed by pressing the Fan Button.
NOTE: During hot days, the unit will cool off the room most
efficiently by setting the temperature at the lowest and the
fan speed at the highest. Reducing the length of the
exhaust duct and insulating the exhaust duct and keeping
direct sunlight to a minimum will also improve the cooling
efficiency.
*WE RECOMMEND SETTING THE DESIRED ROOM
TEMPERATURE AT 70
o
F (21
o
C) OR ABOVE WHEN
FIRST ATTEMPTING TO COOL THE ROOM (ROOM
TEMPERATURE IN EXCESS OF 85
o
F (29
o
C) ). ONCE
THE ROOM HAS COOLED BELOW 80
o
F (26
o
C), YOU
MAY ADJUST THE DESIRED ROOM TEMPERATURE
BELOW THE INITIAL 70
o
F (21
o
C) SETTING.
2) Dehumidifying Operation
a) Install the exhaust ducts properly
b) Plug the Power Cord into the power outlet.
c) Turn on the unit by pressing the ' ' Button on the
control panel.
d) Press the Mode Button until the ‘ ‘ appears on the
Main LED display.NOTE: The unit operates at low fan
speed during dehumidifying. The unit cools room slightly
during the dehumidification. Keep the windows and the
doors closed to aid in the effectiveness of the unit in
removing the moisture from the room. The unit will not
perform dehumidification function when the room
temperature is lower than 61
o
F(16
o
C).
3) Fan Operation
a) Plug the Power Cord into the power outlet.
b) Turn the unit on by pressing the ' ' Button on the
control panel.
c) Press the Mode Button until ‘ ‘ appears on the
Main LED display.
d) Select the fan speed by pressing the Fan Button.
NOTE: When the unit is running on fan mode, the exhaust
duct is inoperative and is not required.
4) Heating Operation
a) Plug the Power Cord into the power outlet.
b) Turn on the unit by pressing the ' ' Button on the
control panel.
c) Press the Mode Button until ‘ ‘ appears on the
Main LED display.
d) Turn the adjustable dial switch until the desired room
temperature appears on the LED. The desired
temperature range is from 61
o
F-88
o
F (16
o
C-31
o
C).
e) Select the fan speed by pressing the Fan button.
It is recommended to use the low fan speed.
NOTE: When the unit is running on heating mode, the
exhaust duct is inoperative and is not required.
5) Auto Operation
a) Install the exhaust ducts properly
b) Plug the Power Cord into the power outlet.
c) Turn on the unit by pressing the ' ' Button on the
control panel.
d) Press the Mode Button until the ‘ ‘ appears on the
Main LED display.
e) Select the fan speed by using FAN button.
During AUTO mode, the unit operates in heating mode
when the room temperature is below 68
o
F (20
o
C). It
operates in dehumidifying mode when the room
temperature is between 68
o
F (20
o
C) to 80
o
F(26.6
o
C). It
operates in cooling mode when the room temperature is
above 80
o
F(26.6
o
C). You may use the timer with the
AUTO mode.
6) Sleep Mode
a) The air conditioner is in operation
b) Press SLEEP Button, the symbol ‘ ‘ appears on
the Main LED display.
c) The fan motor will run on low speed
d) When in cooling mode, within the first two hours, the
temperature will be increased by one degree per hour.
Then the temperature will be kept at 2
o
F higher
than the originally set temperature for 6 hours. 6 hours
later, the temperature will return to the original setting.
e) When in heating mode, within the first 2 hours, the
temperature will decrease by one degree per hour.
Then the temperature will be kept at 2 degrees lower
than the original temperature for 6 hours. 6 hours later,
the temperature will return to its original setting.
g) When in dehumidifying mode, the temperature will not
be changed.
NOTE: When the room temperature is low and the indoor
humidity is high, the condensation formed by the air
conditioner in use may not be discharged quickly. The
symbol ‘ ‘ appears on the Main LED display. In order
for your unit to continue to run, you can pull out the "Drain
Port" which is located in the lower left bottom of the back
of the unit. The condensation will be discharged several
minutes after the water has been drained. Please use at
least a 3.17 pint pan to catch the dripping water. It is not
advisable to use the continuous drain method when the
room temperature is higher than 88
o
(31
o
C).
1)
2)
3)
4)
5)
6)
7)
8)
9)
10)
11)
SOFT TOUCH CONTROLS AND FUNCTIONS
MAIN LED DISPLAY
OPERATING
INSTRUCTIONS
AND
FUNCTIONS
LED DISPLAY
ADJUSTABLE DIAL:
THERMOSTAT & TIMER
Decrease
Increase