


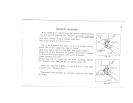
19
2
)
Set
stitch
length
lever
as
near
0
as
possible
without
stopping
the
feeding
action.
(3
)
Position
zigzag
width
lock
on
the
right
to
suit
material
being
sewn
OT
Width
of
buttonhole
desired.
(Number
5
for
the
widest
buttonhole.)
4
)
Set
lower
lock
at
number
2
1/2
on
lower
set
upper
lock
at
twice.
The
size
of
the
lower
lock
for
bar
tack.
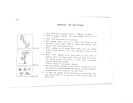
5
)
Lower
needle
carefully
into
the
marks
on
fabric
indicating
the
beginning
of
buttonhole.
Stitch
to
the
mark
for
the
end
of
the
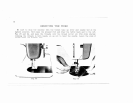
buttonhole,
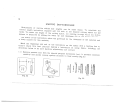
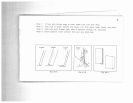
Step
1,
Pig.32,
stopping
machine
with
needle
in
fabric
at
right
side
of
stitching.
6
)
Lift
the
presser
foot
and
using
the
needle
as
a
pivot,
turn
the
fabric
end
for
end.
7
)
Lower
presser
foot
and
turn
hand
wheel
just
enough
to
raise
needle
out
ot
fabric.
(8
)
Drop
feed
all
the
way
down
(drop
feed
knob
at
DN
position)
and
move
zigzag
lever
down
as
far
as
it
will
go
against
lock,.
While
holding
the
lever
at
this
position,
take
five
or
six
stitches
to
form
bar
tack,
Step
2,
Fig.32.
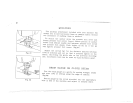
9
)
Raise
needle
out
of
fabric
and
return
feed
to
“HI”
position
and
stitch
width
lever
to
the
lower
position
automatically.
(10)
Stitch
second
side
of
buttonhole,
Step
3.
(11)
Make
bar
tack
by
repeating
(8)
and
(9)
above
.
.
.
Step
4.
(12)
Return
stitch
width
to
0
and
take
two
or
three
stitches
to
fasten
the
threads
and
prevent
raveling.
(13)
Cut
the
buttonhole
opening
with
a
seam
ripper,
being
careful
not
to
cut
the
stitching.
If
you
plan
to
make
buttonholes
on
sheer
soft
material,
place
tarlatan
or
paper,
which
can
be
torn
away
after
stitching,
under
the
fabric.
And
it
is
always
wise
to
make
several
buttonholes
on
scraps
of
fabric
before
working
on
the
garment.