


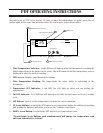
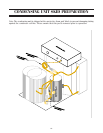

5. Installing refrigeration lines into evaporator housing.
With knockouts removed, install grommets supplied. Install housing, mark location and center line
of holes to be drilled in wall. Slide interior into place, measure the distance from the suction and
liquid line connection locations to the housing knockout opening. Add that dimension to the length
of pipe necessary to penetrate the wall for a rear entry plus enough for an elbow connection if the
pipeistorunupordownthewallonthebacksideoftheunit.A1/2”90°longradiuselbowwillbe
required to connect to a nipple from the suction line and to either a vertical riser through a ceiling
opening or to extend the pipe through the right side of the housing opening and adjacent wall. Add
enough length for the pipes to pass through the wall and connect to another fitting.
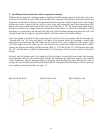
Since the piping is parallel to the evaporator coil and the coil is at an angle with the housing, the
“through the rear” or “side wall pipes” will have to be formed inside the housing to match that
angle prior to connecting. The 90° elbow on the vertical riser can be adjusted to the proper angle
to fit the nipple from the elbow to the coil suction line connection. With measurements taken,
removetheinteriorassemblyandthehousing.Drilla11/2”holeforthe1/2”O/Dsuctionpipeplus
the1/2”wallthicknesscellularinsulationand1/4”liquidpipe.Drillnecessaryholeforelectrical
wiring.
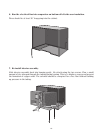
Securely cap the piping ends. It is suggested that the pipes be installed from inside the housing;
the insulation slid over the suction pipe outside the housing; the liquid line taped to the outside
of the insulation; and the housing placed in position while guiding the pipes through the wall or
ceiling. Electrical wiring should be pulled through the housing and the housing secured in position
in accordance with instructions on page 13.
-14-
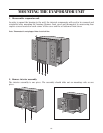
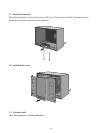
Pipes from the top
Pipes from the side
Pipes from the back