


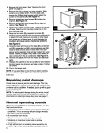

3. Remove the front panel. (See “Cleaning the front
panel” on page 6.)
4. Remove the side curtains (on some models). Slide
curtains out to fullest width. From the back side,
remove the Phillips-head screws which attach the
curtain to the cabinet
(A). See Figure 14.
5. Remove slotted-hex head screws
(B)
holding top
channel.
See Figure 14.
6. Remove slotted-hex head screws (C) on sides of
cabinet.
See Figure 14.
7. Holding the cabinet on both sides, carefully lift cabinet
off base. Watch out for the sharp metal fins on the
front and rear coils.
8. Wrap the fan motor
(E),
capacitor terminals
(F),
electrical control panel
(I),
and compressor terminals
(J),
in plastic film and make sure no water or other liquid
gets inside any of these parts. It could damage the
insulation and cause serious mechanical problems.
See Figure 15.
9. Carefully clean and hose out the base
(K),
condenser
coil (D), evaporator coil (G), and condensate pan
(H).
Clean at least once a year or more often if the con-
denser and evaporator coils and pan collect dirt, sand,
leaves, insects, or algae. Also, clean if you detect an
odor coming from the air conditioner. SW
Figure 15.
10.
Remove the plastic film from the motor and electrical
parts.
11.
Replace the cabinet on the air conditioner and reattach
the front panel, top channel, and side curtains. Tighten
all screws.
12. Plug in the power cord.
NOTE:
It is a good idea to wait 24 hours before starting
the air conditioner again. This allows time for all areas
to dry out.
Repairing paint damage
Check once or twice a year for paint damage. This may
occur, especially in salty environments (near oceans, etc.)
or where rust is a problem. If needed, touch up with a good
grade enamel paint.
NOTE:
To reduce paint damage during the winter, install
a heavy-duty cover on your air conditioner’s cabinet. For
information on ordering a heavy-duty cover see page 11.
Normal operating sounds
When your air conditioner is operating normally, you may
hear such sounds as:
l
A “pinging” sound caused from water droplets hitting the
condenser. This is an energy efficient design whereby
the water cools the condenser.
l
Air movement from the fan.
l
Clicks from the thermostat cycling on and off.
l
Vibrations or noise due to poor wall or window
construction.
l
A high pitched hum or pulsating noise caused by the
modern high efficiency compressor cycling on and off.
8
Q