


27
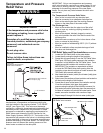
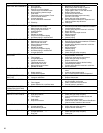
PILOT LIGHT TROUBLESHOOTING CHART
Have you bled all the air
from the pilot tube and
gas supply line?
NO
While repeatedly depressing the igniter button,
hold down the reset button until the pilot is lit and
maintains a stable flame, then slowly release the
reset button.
YES
Section A: Pilot light will not light. Section B: Pilot light will not remain lit or repeatedly goes out.
Check for insufficient combustion air.
Are there openings for
make-up air to enter the
room?
Are the openings of sufficient size?
See Combustion Air Supply and Ventilation
section in this manual for requirements.
Is there a furnace/air handler in the same room as the water heater?
Does the return air duct for the furnace/
air handler draw its air from a separate
location than the water heater? See the
Location Requirements section and the
Combustion Air Supply section.
Is there proper drafting at the
draft hood? See Checking the
Draft section in this manual.
Remove the burner door
assembly. Is the flame-trap and
burner free from debris due to
excessive lint, dirt, dust or oil?
Install correct size make-up air openings per the
Combustion Air Supply and Ventilation section in
this manual.
NO
Refer to the Use & Care Guide section
of this manual for information on
cleaning the flame-trap and burner.
Contact a local Heating,
Ventilation, Air-Conditioning
& Refrigeration authorized
service provider.
Is the gas turned on?
NO
YES
Check the manual gas shut-off valve to
see if it is in the open position, if it is open
then contact the gas utility company.
Is the igniter producing a
spark?
NO
YES
Follow the Testing the Igniter System
instructions in this manual.
* This procedure requires the removal of water heater components.
Is the thermocouple securely
connected to the gas control
valve/thermostat?
NO
YES
Make sure the thermocouple is securely
connected. Finger tighten then give a
additional 1/2 turn with a wrench.
Is the pilot tube and/or orifice
free from dirt and debris?
NO
YES
Follow the Replacing the Pilot Assembly
instructions found in this manual to access
pilot tube and orifice. Clean as needed and
reinstall pilot tube and orifice.*
Is the pilot free from dirt and
debris?
NO
YES
Follow the Cleaning the Pilot Assembly
instructions found in this manual.*
Is the pilot protected from cold
drafts that could prevent it
from lighting.
NO
YES
Eliminate any drafts. See the
“Site Location” instructions found
in this manual.
Check the water heater for a Flammable Vapor (FV) event.
If the flame-trap show signs of discoloration, shut-off the gas supply
to the water heater at the manual gas shut-off valve, then contact
Customer Service at: 1-877-817-6750.
Is the pilot tube and/or orifice
free from dirt and debris?
NO
YES
Follow the Replacing the Pilot Assembly
instructions found in this manual to access
pilot tube and orifice. Clean as needed and
reinstall pilot tube and orifice.*
Is the pilot free from dirt and debris?
NO
Follow the Cleaning the Pilot Assembly
instructions found in this manual.*
YES
YES
Correct size of openings to
allow sufficient air.
NO
YES
YES
YES
NO
Check the vent system for
restrictions/obstructions and check
the vent termination height. Refer to
the Installation Instructions section of
this manual for specific requirements.
NO
YES
NO
Is the thermocouple fully
seated in the pilot bracket?
Push the thermocouple
forward until it is fully seated in
the pilot bracket and retest.*
YES
Test the thermocouple using the following procedure: Disconnect the thermocouple
from the gas control valve/thermostat. Using a multimeter with alligator clip leads,
attach the red lead to the body (copper part) of the thermocouple. Attach the black lead
to the end (silver part) of the thermocouple that connects to the gas control valve/
thermostat. Follow the instruction to light the pilot and watch the voltage readings on
the multimeter. After 45 seconds the meter should read 12 millivolts DC or more.*
Replace the gas control
valve/thermostat.*
NO
Does the thermocouple pass the test?
YES
Replace the thermocouple.
NO
NO
NO
YES
Remove the burner door assembly. Is
the flame-trap free from dirt or debris?
See “Removing the Burner Door
Assembly” section of the manual for
removal instructions.*
Clean the flame-trap
with a soft bristle brush
or vacuum cleaner.
NO
Does the flame-trap show signs of discoloration.
Shut-off the gas supply to the water heater at
the manual gas shut-off valve, then contact
Customer Service at: 1-877-817-6750.
YES
YES