


6
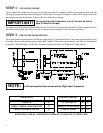
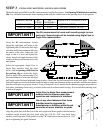
Trim the top of each wear strip at a 45° angle as shown and clip onto the appropriate
leg of each guide. Be sure that trimmed edges of the wear strips end just below the
flare of the guides. Install the bottom bar stops with the same 5/16-18 x 5/8” truss
head bolts and flange nuts used to assemble the guides (no washer). Leave the
fasteners loose to allow the bottom bar stops to pivot out of the way of the bottom bar
angle when the curtain will be pulled into the guides. You will be instructed to
tighten the bottom bar stop fasteners in step #7.
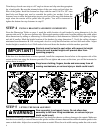
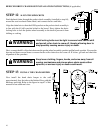
STEP 4 INSTALL BRACKETS AND DRIVE COMPONENTS
From the Dimension Tables on page 4, mark the width location of each bracket by using dimension A for the
operator side and 6” for the non-operator side. If the actual opening width varies from the packing slip width, adjust
these dimensions by adding or subtracting ½ of the difference to each dimension. Subtract if the opening is larger
and add if smaller. Mark the height location of the brackets by using dimension C. Verify the ceiling clearance
minimum from dimension B. Use a string and a level to verify that the brackets are level with each other. Adjust
bracket height as needed to level. Drill anchor holes and fasten the brackets with the anchors provided.
Brackets must be level to each other with respect to height.
Failure to level bracket heights will prevent door from
operating properly.
If the door is to be chain hoist or motor operated, install the components shown below to the operator side of the
curtain at this time using the fasteners provided. Do not tighten set screws at this time, you will be instructed to
tighten these in step #9.
Keep loose clothing, fingers, hands and arms away from all
moving mechanisms, or serious injury or death could result.
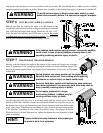
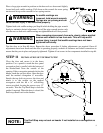
STEP 5 LIFTING THE DOOR ASSEMBLY
Door assembly is extremely heavy. Do not allow door
assembly to fall from lifting mechanism, or serious injury or
death could result.
Lift door assembly up to door support brackets. Care should be taken to avoid any damage to the curtain. Make sure
that the door assembly is centered between the guides and that clearance between the windlocks and the guides is the
same on both sides. Adjust door assembly location as needed. Place the axle saddle castings under the axle on each
WARNING
WARNING
IMPORTANT!