


-4-
WIND LOAD POST
INSTALLATION INSTRUCTIONS
SECURING POSTS FOR STORAGE
Step 1:
Locate a convenient location as close to the door as possible and
mount a header lock bracket to the wall such that the distance be-
tween the bottom of the header lock bracket and the fl oor is 4” greater
than the distance between the fl oor and the bottom of the header lock
bracket mounted over the door. The header lock bracket for storage
shall be mounted with a minimum of (2) 5/16” x 1-5/8” lag screws
(one each side) into solid wood. Masonry anchors may be substituted
for mounting directly to masonry or concrete. Provide wood blocking
adequately secured to structure as required for other substrates.
Step 2:
Mount a half hinge to the wall in line with the header lock bracket such
that the distance between the centerline of the tube in the half hinge
and the fl oor is 4” greater than the distance between the centerline
of the tube in the half hinge on the door and the fl oor when the door
is fully closed. The half hinge for storage shall be mounted with a
minimum of (2) 5/16” x 1-5/8” lag screws into solid wood. masonry
anchors may be substituted for mounting directly to masonry or
concrete. Provide wood blocking adequately secured to structure as
required for other substrates.
Step 3:
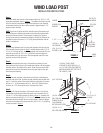
Place the post into the storage position by lowering the top plate
extension into the notch in the header lock bracket until the top plate
extension seats in the bottom of the notch. Secure the bottom locking
strap to the half hinge using the 5/16” hitch pin. Place all remaining
hitch pins into the remaining locking straps for storage. Insert the
plastic plug into the hole in the fl oor.
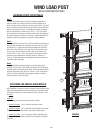
ATTACHING THE INSTALLATION DECALS
After installation is complete, locate an obviously visible location on the
inside of the garage door and the post and place the provided installa-
tion labels and tag onto the door and post for future reference - refer
to fi gure 5.
Important
Labels and tag must be attached to both door and post.
1. Applied by installer - one (1) wind load psf label per door.
2. Applied by installer - one (1) wind load post installation instructions
label to be applied to inside of door, near end of second section.
3. Applied by installer - one (1) emergency high wind situations tag
to be applied to post(s) when stored on wall for constant reminder to
consumer.
FIGURE 5