


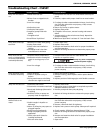

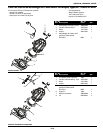
Troubleshooting Chart - CSE50T
Symptom Possible Cause(s) Corrective Action
Pump will not start or
run
Pump starts and stops
too often
Pump shuts off and
turns on independently
of switch (trips thermal
overload protection)
Pump operates noisily
or vibrates excessively
Pump will not shut off
Pump operates but
delivers little or no
water
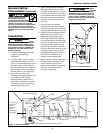
1. Water level too low
2. Blown fuse or tripped circuit
breaker
3. Low line voltage
4. Defective motor
5. Defective float switch
6. Impeller (pump filled with
debris)
7. Tangled switch
8. Insufficient liquid level
1. Backflow of water from piping
2. Faulty float switch
3. Check valve not installed or
leaking
4. Discharge head is less than
manufacturer’s minimum
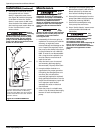
1. Excessive water temperature
2. Defective switch or entangled
switch is causing pump to run
dry
3. Low line voltage
1. Worn bearings
2. Debris in impeller cavity or
broken
3. Piping attachments to building
structure too rigid or too loose
1. Defective float switch
2. Float switch movement restricted
3. Restricted discharge (obstruction
in piping)
4. Excessive inflow or pump not
properly sized for application
1. Low line voltage
2. Debris caught in impeller or
discharge
3. Worn or defective pump parts or
plugged impeller
4. Pump running backwards
5. Pump not properly sized for
application
6. Check valve stuck closed or
installed backwards
7. Shut off valve closed
1. Pump switch will not turn on unless water covers top of
pump
2. If blown, replace with proper sized fuse or reset breaker
3. If voltage is under recommended minimum, check wiring
size from the main switch on property. If OK, contact
power company.
4. Return for service or replace motor
5. Replace float switch
6. If impeller will not turn, remove housing and remove
debris
7. Arrange switch so the switch moves freely. Reposition
pump if necessary
8. Make sure liquid level is at least 13" from the basin floor
1. Install check valve
2. Replace float switch
3. Remove and examine check valve for proper installation
and free operation
4. Recheck all sizing calculations to determine proper pump
size
1. Pump should not be used for water above 120°
2. Replace or reposition pump
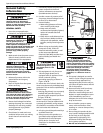
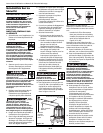
Pump may start unexpectedly.
Disconnect power supply
before servicing
3. If voltage is under recommended minimum, check wiring
size from the main switch on property. If OK, contact
power company
1. Return for service or replace
2. Remove housing, clean impeller and/or replace broken
impeller
3. Replace portion of discharge pipe with flexible connector
1. Replace float switch
2. Reposition pump or clean basin as required to provide
adequate clearance for float
3. Remove pump and clean pump & piping
4. Recheck all sizing calculation to determine proper pump
size
1. If voltage is under recommended minimum, check wiring
size from the main switch on property. If OK, contact
power company
2. Remove, clean and check for tightness
3. Replace worn parts or entire pump. Clean parts if required
4. Check rotation. (CCW from bottom) Return if CW
5. Recheck all sizing calculations to determine proper pump
size
6. Remove and examine check valve for proper installation
and free operation
7. Open valve
www.waynepumps.com
5
CSECAP40, CSECAP50, CSE50T