


– 6 –
USING SCALEBLOCKER RELEASE
TM
Do not use alcohol-based cleaners. Clean the inside of the filter housing with a mild soap.
Inspect the O-Rings for damage and replace if necessary.
Wipe the large black O-Ring clean with a rag, press it down into the groove and then apply a very
light coating of white petroleum jelly (Vaseline). Make sure the O-Ring fits in the groove and is
properly seated each time the filter is reassembled, otherwise a water leak could occur.
With the filter removed, insert the dip tube into the housing cap. Pour the contents of both
ScaleBlocker Release packages 2 lbs. total (
0.746 kg) into the bowl of the lower filter housing.
Add warm water, stir to dissolve.
Using the supplied wrench, screw the lower filter housing into the filter mounting head until a
definite stop is felt.
On combi ovens, follow the Clean Cycle Deliming Procedure in the
Installation & Operation
manual (on older model combi ovens, follow the deliming procedure in the manual shipped with
the oven).
On steamers, turn on the filter water supply valve and turn the steamer on. Allow the steamer
to operate so steam is flowing through the compartments for approximately 35 minutes. Turn the
steamer off.
On steamers and combi ovens, turn off the incoming water supply valve to the filter. Press the
red pressure relief button on top of the filter mounting head to release pressure in the system.
Unscrew the lower filter housing and dump out the water. Replace the filter cartridge.
RETEST THE WATER AND RETURN THE RESPONSE CARD
Test the incoming unfiltered water supply with the enclosed 4-IN-1 City Water Check test strip by
carefully following the instructions on the package. Record the results on the enclosed Filter
Registration Card. Use the Vulcan-Hart equipment model and serial number, not the filter system
model/ serial number. Fill the registration card out completely and return the information to Vulcan
in one of the following three ways: Mail the postage-paid self-addressed card to Vulcan, FAX the
completed card per instructions on the card or contact Vulcan online at
www.vulcanhart.com
, select
the Service tab and answer all the necessary questions.
NOTE: Returning the Filter Registration Card is required at the time the PM is performed to continue
warranty coverage on the equipment installed with the filter.
REPLACING THE FILTER CARTRIDGE
Make sure the large black O-Ring and the two flat white rubber washers are in their proper place
when the new filter cartridge is installed and the lower housing is reassembled to the filter
mounting head. Make sure the filter cartridge is oriented so the hole in the middle of the top is
up. Make sure the lower flat washer is properly positioned as the cartridge is lowered. Make sure
the upper white flat washer is over the top hole of the filter cartridge. Make sure the large black
O-Ring is properly seated in the groove. Using the supplied wrench, screw the lower filter
housing into the filter mounting head until a definite stop is felt and the filter cartridge is sealed.
Make sure the boiler tank has completely drained.
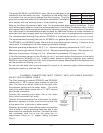
Turn on the incoming water supply valve to the filter. Press the red pressure relief button on top
of the filter mounting head until all the air is purged from the filter. Depress the water meter reset
button using a blunt object such as a paper clip.