


USSC 11
MAINTENANCE INSTRUCTIONS
As with all fuel burning appliances, it is important to conduct periodic maintenance functions that will allow for contin-
ued safe, efficient operation of the unit. We suggest that before every heating season, or at least once a year, conduct
the following minimum service functions.
STEP 1: The gas supply should be turned OFF at the shutoff valve in the supply line leading to the appliance or at the
gas source. The gas to the unit should then be disconnected so the unit can be removed from the wall.
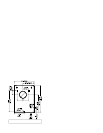
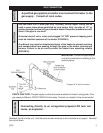
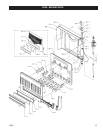
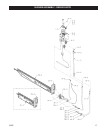
STEP 2: Remove the front cover by removing the control knob and the two(2) screws on the top of the front. Then slide
the front upwards.
STEP 3: Carefully examine the interior of the vent pipe. If you notice any blockages or obstruction that was not part of
the unit when it was installed. Clean the pipes and prepare them for reattachment to the unit.
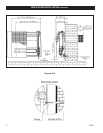
The vent system should be inspected periodically, or at least once a year and cleaned if necessary. If removal of the
venting is required, follow the instructions in the “Ventilation Installation” section of this manual for reassembly.
STEP 4: Look inside the openings of the rear of the unit and check for foreign materials. Remove any objects which may
block or obstruct the free flow of combustion and ventilation air.
STEP 5: Visually check the pilot and the main burner for signs of excessive dirt or debris through the heat exchanger
front glass. If you find any of these, follow the directions below to reach the components to clean, otherwise continue to the
next step.
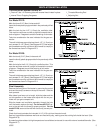
To Remove Pilot: Find the pilot. Loosen the head of thermocouple, disconnect the pilot gas supply line, (only on the side
of the pilot, not on the valve side). Remove the two(2) M4 screws that hold the pilot in place. Clean with a vacuum cleaner
or use a can of compressed air.
To Remove Burner: Loosen the gas line from the burner (on the right side of the unit). On the left side of the unit,
unscrew the nut that holds the burner in place. Then remove the burner. Clean with a vacuum cleaner or use a can of
compressed air. Note: You can remove the main burner-pilot assembly if you don’t unscrew the M4 screws that hold the
pilot to the burner.
Before reinstalling the assembly, check the ceramic fiber sealing gasket. If it is damaged or worn, replace with new gasket
available from your dealer.
STEP 6: Reassembly the unit back to its original state and mount the unit to the wall. Properly reassemble and reseal
the vent-air intake system.
STEP 7: Reconnect the gas supply and check for leaks using a soapy water solution. Bubbles on any of the joints
indicate a leak is present and must be repaired. Turn off the gas when making such repairs. Check to make sure that the
piezo ignitor still lights the pilot.
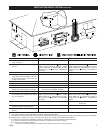
STEP 8:
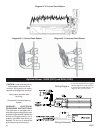
While the main burner is ON, Check the flames to verify that they are burning a clean blue color. (See Diagrams 10-
12)
Note: After maintenance, the first few minutes of the heater operation will probably have some yellowish flying traces in
the flame due to the burning of particles left behind during the cleaning operation.
** Liquid Propane will have some evidence of yellow tips on the flame.
Before completing your periodic maintenance check, ensure the heater area is kept clean and
free from combustible materials, gasoline and other flammable vapors and liquids. Also,
check to see that the flow of combustion and ventilation air around the vent cap on the outside
of the structure is not obstructed.
Any safety screen or guard removed for servicing an appliance must be replaced prior to
operating the appliance