16 USSC
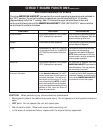
COMPONENT OPERATION START OPERATION END
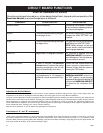
CIRCUIT BOARD FUNCTIONS
START-UP SEQUENCE OF EVENTS
Once the control panel is turned to on, a timer begins that will start, stop and continue operation of the
American Harvest as a preset temperature is achieved.
Exhaust Blower
Agitator
Auger
Room Fan
Automatic Shutdown
Normal Operation
Starts Immediately
Three minutes after starting the agita-
tor will begin to turn
Three minutes after starting the auger
will begin to turn
Begins when 110 degrees is reached.
If after 15 minutes, the American
Harvest has not reached the preset
operating temperature, the unit will
begin to automatically shut down.
If after 15 minutes the preset operat-
ing temperature of 110 degrees is
achieved, normal operation will con-
tinue.
Will continue until shutdown. Shutdown
will occur when the operating tempera-
ture is below 90 degrees.
Will continue intermittingly, has deter-
mined by the “HEAT SETTING”, until
shutdown
The auger will continue at the feed rate
specified by the “HEAT SETTING”.
NOTE: Safety switches, HI limit and
vacuum sensor, must be activated to
continue proper operation.
Will continue to operate until the
AMERICAN HARVEST cools down to
below 90 degrees. This may take sev-
eral minutes up to an hour.
Should the timer expire before the
preset operating temperature is
achieved, simply reset the stove by
pressing the “ON” buttton.
Operation will continue until either the
AMERICAN HARVEST control is to
the “OFF” position, or the operating
temperature falls below 90 degrees. At
such time the AMERICAN HARVEST
will default to the “Automatic Shut
Down”.
Adjusting the Air/Fuel Mixture
The two adjustments necessary for proper air/fuel mixture are the combustion air/blower setting and the auger run time setting. These two
adjustments are the basis for allowing this model the ability to burn many types of fuel in many different installations.
The auger run time adjustment is made by pressing the “A” button and adjusting the nine variables up or down as necessary. This allows the user
ultimate control of the amount of fuel delivered. Increasing the number displayed, feeds more fuel and lowering the number deceases the fuel.
When adjustments are needed for the Combustion air/blower, press “B” and adjust up or down as required. The adjustments made here are
saved automatically and applied to all nine heat ranges. Even though all nine heat ranges are affected, the lower ranges are adjusted the most.
These adjustments allow, “tweaking” your unit for maximum efficiency.
Note: On some models the “A” and “B” buttons are deactivated from the factory.
If activation of “A” and “B” is necessary
• Step 1 turn unit “ON”.
• Step 2 Press and hold the Blower “UP” arrow and the Heat range “DOWN” arrow at the same time for 5 seconds. In most cases, you will see
the numbers displayed in the heat range window and blower window blink. Then release the buttons and press “A” or “B” buttons to check
activation. When activated, pressing either button will display a light above that letter and display a single digit in the blower speed window. The
heat range window will be blank. If not activated, repeat the Step 1.


