


6 PKG-SVX14A-EN
Pre-Installation Considerations
Pre-Installation Checklist
Complete the following checklist before
beginning unit installation.
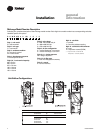
Verify the unit size and tagging with the
unit nameplate.
Make certain the floor or foundation is
level, solid, and sufficient to support the
unit and accessory weights. Level or
repair the floor before positioning the
unit if neccesary.
Allow minimum recommended
clearances for routine maintenance and
service. Refer to unit submittals for
dimensions.
Allow three fan diameters above the
unit for the discharge ductwork. Return
air enters the rear of the unit and
conditioned supply air discharges
through the top.
Electrical connection knockouts are on
the top, left side of the unit.
Allow adequate space for piping
access and panel removal. Condenser
water piping, refrigerant piping, and
condensate drain connections are on
the lower left end panel.
Electrical supply power must meet
specific balance and voltage
requirements as described in the
“Electrical Requirements” section.
Water-cooled units only: The installer
is responsible for providing a condenser
main, standby water pump, cooling
tower, pressure gauges, strainers, and
all components for waterside piping.
See the “Water Piping” section for
general waterside recommendations.
Air-cooled units only: The installer is
responsible for providing and installing
the remote air-cooled condenser and
refrigerant piping, including filter driers.
Receiving and Handling
Shipping Package
Midrange units ship assembled on skids.
Units ship assembled, piped, and charged
with either R410a (model SCWH)
or a dry nitrogen charge (model SCRH).
Receiving Checklist
Complete the following checklist
immediately after receiving unit
shipment to detect possible shipping
damage.
Inspect individual cartons before
accepting. Check for rattles, bent carton
corners, or other visible indications of
shipping damage.
If a unit appears damaged, inspect it
immediately before accepting the
shipment. Make specific notations
concerning the damage on the freight
bill. Do not refuse delivery.
Inspect the unit for concealed damage
before it is stored and as soon as
possible after delivery. Report
concealed damage to the freight line
within the allotted time after delivery.
Check with the carrier for their allotted
time to submit a claim.
Do not move damaged material from
the receiving location. It is the receiver’s
responsibility to provide reasonable
evidence that concealed damage did
not occur after delivery.
Do not continue unpacking the
shipment if it appears damaged. Retain
all internal packing, cartons, and crate.
Take photos of damaged material if
possible.
Notify the carrier’s terminal of the
damage immediately by phone and
mail. Request an immediate joint
inspection of the damage by the carrier
and consignee.
Notify your Trane representative of
the damage and arrange for repair.
Have the carrier inspect the damage
before making any repairs to the unit.
Unit Storage
Take precautions to prevent condensate
from forming inside the electrical
compartments and motors if the unit is
stored before it is installed.
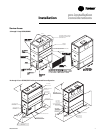
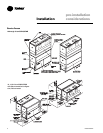
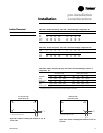
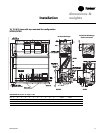
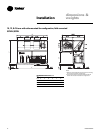
Service Access
Maintain adequate clearances around
and above the unit to ensure proper unit
operationa nd allow sufficient service
accesss. Trane recommends 36-inches
service access on all sides fo the unit.
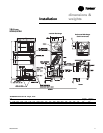
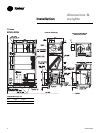
Service access locations are shown in
figures on pages 8 through 9.
WARNING
Hazardous Voltage!
Disconnect all electric power, including
remote disconnects before servicing.
Follow proper lockout/tagout
procedures to ensure power cannot
be inadvertently energized. Failure to
disconnect power before servicing
could result in death or serious injury.
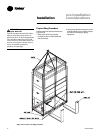
Installation Preparation
Before installing the unit, perform the
following procedures to ensure proper
unit operation.
1. Verify the floor or foundation is level.
Shim or repair as necessary. To ensure
proper unit operation, install the unit
level in both horizontal axes.
2. Allow adequate service and code
clearances as recommended in
“Service Access” section. Position the
unit and skid assembly in its final
location. Test lift the unit to determine
exact unit balance and stability before
hoisting it to the installation location.
See the “Proper Lifting Procedure”
section for proper rigging procedures
and cautions.
3. Remove the skids from under the unit.
If you find internal damage, file a claim
immediately to the delivering carrier.
4. Remove the protective shipping covers
from the unit.
5. Verify the compressor isolator shipping
brackets are removed and the isolators
are properly tightened for operation.
Installation
pre-installation
considerations