


– 109 –
3
4
2
1
6
5
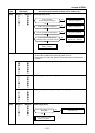
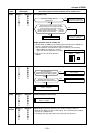
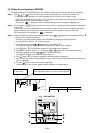
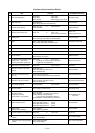
Connector (CN504)
for drain pump
SW501
CN34
(Red)
J01
J02
Jumper wire (J02)
NoneSM40 to 56Slim Duct
Type
If the plug for short-circuit is attached on the P.C. board
before replacement, attach it on the P.C. board replaced.
<Fig. 1 RBC-AMT32E>
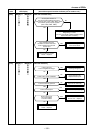
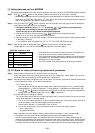
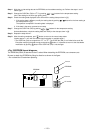
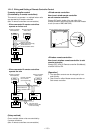
[3] Writing the setting data to EEPROM
The settings stored in the EEPROM of the P.C. board for indoor unit servicing are the factory-set values.
Step 1 Push
SET
,
CL
and
TEST
buttons on the remote controller simultaneously for more than 4 seconds.1
∗ In the group control operation, the unit No. displayed for the first time is the header unit No.
At this time, the CODE No. (DN) shows “
”. Also, the fan of the indoor unit selected starts its operation
and the swing operation starts if it has the louvers.
(The unit No. “
” is displayed if the auto-address setting mode is interrupted in [2] step 2 a))
Step 2 Every time when
UNIT LOUVER
button is pushed, the indoor unit No. in the group control operation are displayed
in order.
2
(The settings stored in the EEPROM of the P.C. board for indoor unit servicing are the factory-set values.)
Specify the indoor unit No. with its P.C. board replaced to the P.C. board for indoor unit servicing.
(You cannot perform this operation if “
” is displayed.)
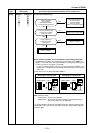
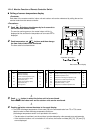
Step 3 Select the CODE No. (DN) can be selected by pushing the
/ button for the temperature setting. 3
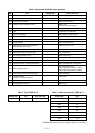
• Set the indoor unit type and capacity.
The factory-set values shall be written to the EEPROM by changing the type and capacity.
1. Set the CODE No. (DN) to “
”. (without change)
2. Select the type by pushing
/ buttons for the timer setting. 4
(For example, 4-way Air Discharge Cassette Type is set to “0001”. Refer to table 2)
3. Push
SET
button. 5 (The operation completes if the setting data is displayed.)
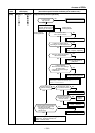
4. Change the CODE No. (DN) to “
” by pushing / buttons for the temperature setting.
5. Select the capacity by pushing
/ buttons for the timer setting.
(For example, 80 Type is set to “0012”. Refer to table 3)
6. Push
SET
button. 6 (The setting completes if the setting data are displayed.)
7. As P.C. board of the Slim Duct type differs from that of the 4-way Discharge Cassette type, selection by
HP is unnecessary.
8. Push the
TEST
button to return to the normal stop status.
(It takes approx. 1 min until the remote controller operation is available again.)