


– 86 –
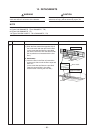
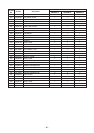
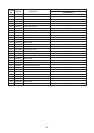
No. Part name Procedure Remarks
1. Detachment
1) Perform works until opening of the electric
parts box cover in works of 1 of f.
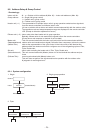
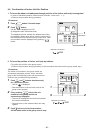
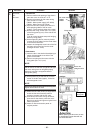
2) Remove connectors for fan motor wiring
from control P.C. board.
CN333 : Motor power supply (5P: White)
CN334 : Motor control (5P: White)
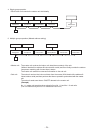
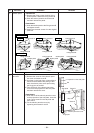
3) Open the fan case (under) and remove it
while pressing claws of the fan case
(under). (There are both sides of the case)
4) Remove the fixing screws (Ø5 x 10, 2 pcs.)
of the fixing plate (2 pcs.) at the side of the
fan motor.
(The fan motor becomes temporal hanging
status by fixing plate.)
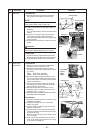
5) While supporting the fan motor by hands,
remove the fixing plate from the motor base
to remove the fan motor.
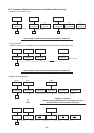
6) Loosen the hexagonal screw hole of the fan
and then pull out the fan from the shaft.
(Hexagon wrench : 3mm)
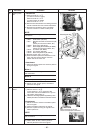
2. Attachment
1) Insert the fan in the shaft while adjusting to
match the hexagonal screw hole to the
groove of the shaft.
2) Perform screwing the fan motor with the
fixing plate (Ø5 x 10, 2 pcs.)
NOTE
Match the fan motor with turning direction of
the fan and fix so that the 40 type and 80 type
fan motor wirings are at refrigerant piping
side and 140 type is at opposite side of
refrigerant piping.
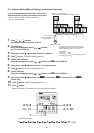
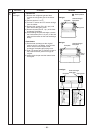
3) While positioning so that the fan is at the
center of the fan case (upper), fix the fan
with hexagonal screw.
NOTE
Be sure to use a torque wrench for fixing and
tighten with 4.9N•m or more.
4) Attach the fan case (under) as original and
check the fan turns smoothly without
coming to contact with the fan case.
5) Connect the fan motor wirings as before,
close and fix the electric parts box cover.
Be sure to perform wirings as original in the
electric parts box.
6) Attach air filter and suction panel as
original position.
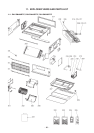
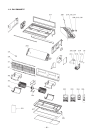
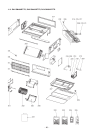
Fan motor,
Fan,
Fan case
h
Fan motor wiring
CN333
CN334
Fixing screw
Fixing sheet metal
Screw with
hexagonal hole
Refrigerant
pipng side
140 Type
80 Type
40 Type
CAUTION
When replacing the fan motor, be sure
to exchange the clamp filter with the
fan motor lead wire.