


All installations and services must be performed by qualified service personnel.
17
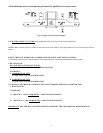
B. CAD CELL CHECKOUT PROCEDURE:
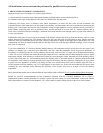
1. Remove cad cell lead wires, then start the burner. Shortly after burner starts, place a temporary jumper between
terminal f - f. Connect ohmmeter across cad cell lead wires - resistance should be under 1600 ohms.
2. Stop burner and remove temporary jumper.
3. With the burner off, check dark cell resistance across cad cell lead wires. Resistance should be greater then 20,000
ohms. If cell resistances are different from above, recheck wiring location of cell, etc. If necessary, replace plug in
portion of cell, (Part No. 350104).
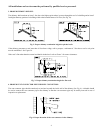
4. Reconnect cad cell lead wires. Check out the Protectorelay control (primary control) according to the instructions
packed with the control.
C. CLEANING OR REPLACING FLUE PIPES:
Flue pipes should be inspected during the annual maintenance check-up or during each subsequent service call.
Flue pipes should be inspected for restrictions due to soot or carbon build-up as well as foreign matter or any
material which may cause the venting system to become restricted and not allow the proper venting of combustion
products. If a restriction occurs, the flue pipe must
be cleaned or replaced to ensure proper venting.
Flue pipes should also be inspected for any signs of corrosion, deterioration or leakage that may cause combustion
byproducts to infiltrate the home or indoor environment. If signs of corrosion, deterioration or leakage are evident
then the flue pipe must be replaced with a properly sized agency approved flue pipe.
D. EXTENDED SHUT DOWN AND RESTART: If an oil furnace is shut down or off for an extended period of
time, several steps can be taken to help insure a smooth and reliable restart.
ON SHUT-DOWN:
1. Close oil supply valve.
2. Disconnect power to the unit.
3. Fill oil tank to prevent condensation.
4. If shut down exceeds one season, an oil stabilizer should be added to the oil tank as recommended by your oil
supplier.
ON START-UP:
1. Have system inspected and started by a qualified service person.
2. Check oil level in tank. If tank has not been filled with fresh oil, inspect oil for signs of contamination such as
water, algae, dirt or other impurities.
3. Change oil filter cartridge and clean canister.
4. Set thermostat above room temperature.
5. Open all valves in the oil supply line.
6. Open the inspection cover on upper mounting plate.
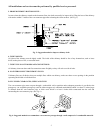
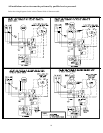
7. Turn on the main power or service switch to unit to start the burner. If the burner does not start, immediately
reset the manual overload switch on the motor (if so equipped) and the safety switch of the burner primary
control. Bleed the fuel unit as soon as the burner motor starts rotating. To bleed the fuel unit or pump, attach
a clear plastic hose over the vent plug. Loosen the plug and catch the oil in an empty container. Tighten the
plug when all the air appears to be purged. If the burner stops during bleeding; wait three to five minutes for
the control safety switch to cool then manually reset the switch completing the bleeding procedure.