


11
NOTE: DIAGRAMS & ILLUSTRATIONS ARE NOT TO SCALE.
SUPERIOR
®
B-VENT GAS FIREPLACES • MODELS SLBV-35, SLBV-40 • CARE AND OPERATION INSTRUCTIONS
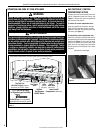
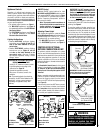
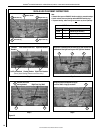
Figure 6
REMOVING AND INSTALLING
THE GLASS ENCLOSURE PANEL
*IMPORTANT!
Bend up the
Top Standoff
Spacers before
installation.
Use outer pair
for 1/2" materials
and inner pair
for 5/8" materials.
Top
Standoff
Spacers*
Control
Compartment
Panel
Hood
Glass
Enclosure
Spring Latch
Panel
Lower
Enclosure Panel
Flush
Nailing
Flange
1/2"
Nailing
Flange
5/8"
Nailing
Flange
WARNING
Any safety screen or guard
removed for servicing the appli-
ance must be replaced prior to
operating the appliance.
AVERTISSEMENT
Tout écran ou protecteur retiré pour
permettre l’entretien de l’appareil
doit être remis en place avant de
mettre l’appareil en marche.
WARNING
• Do not attempt to substitute
the materials used on this door
or replace cracked or broken
glass.
• Handle this glass with extreme
care! Glass is susceptible to
damage; do NOT scratch or
handle roughly while reinstalling
the glass door frame.
• The glass door(s) of this appli-
ance must only be replaced as
a complete unit as provided by
the manufacturer. Do not attempt
to replace broken, cracked, or
chipped glass separately.
• Do not attempt to touch the front
enclosure glass with your hands
while the fireplace is in use.
WARNING
Do not operate appliance with
the glass front removed, cracked
or broken.
AVERTISSEMENT
Ne pas utiliser l'appareil si le pan-
neau frontal en verre n'est pas en
place, est craqué ou brisé.
Only doors certified with the appliance
shall be used.
Seules des portes certifiées pour cet
appareil doivent être utilisées.
CAUTION: DO NOT abuse glass enclosure
panel by striking or slamming shut.
This appliance is designed to operate only
when the glass enclosure panel is installed.
Do NOT remove the glass enclosure panel unless
necessary (e.g., to gain access to components
within the firebox or to clean the glass).
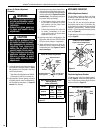
Removing the Glass Enclosure Panel
1. Refer to Figure 6. To access the spring
latches securing the front glass enclosure
panel, open the lower control compartment
door by lifting and pulling the bottom panel
forward.
2. Pull the spring latches forward and down to
release them from the lower door channel.
3. Pull the bottom of the glass enclosure panel
out a few inches, and grasp it on the right
and left sides. Gently lift to release the panel
from its upper channel, and then pull the
enclosure panel forward to remove it.
4. Visually inspect the gasket on the backside
of the enclosure panel frame. The gasket
surface must be clean, free of irregularities,
and firmly seated.
Installing the Glass Enclosure Panel
1. Refer to Figure 6. Position the glass enclo-
sure panel in front of the rebox opening,
with the bottom of the enclosure panel held
away from the replace. Hook the top ange
of the enclosure panel frame over the top of
the firebox frame.
2. Gently move the bottom of the enclosure
panel frame toward the replace, ensuring
that the gasket seats evenly. Fasten the
two latches under the firebox floor to the
vee-flange on the enclosure panel. Close
both latches securely.