


TO CLEAN ELECTRONIC COLLECTING CELL
NOTE: When handling the collecting cell, care should
be taken to avoid damaging wires and metal
plates.
Do not wash Charcoal Filter. Do not
wash Electronic Collecting Cell in dishwasher.
Slide out Pre-Filter located on front of the Cell. Rinse
thoroughly with clean warm water. Set aside to dry.
Use dishwashing detergent and the hottest water
available to make a good soaking solution.
NOTE:
If the Cell is extremely dirty, spray the cell with
a household cleaning agent such as 409, Fan-
tastik or Lysol. Let the cell
soak five
(5) minutes
before proceeding to washing instructions.
Completely immerse the Cell and soak for 20 to 30
minutes.
.
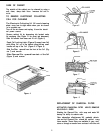
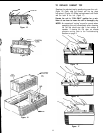
After the Cell has soaked sufficiently, it should be
shaken vigorously in water until clean. (Figure 9)
Thoroughly rinse both sides of the cell. If a sprayer is
available, spray with water. (Figure 10) Check to make
sure the cell plates are clean. Carefully wipe with a
Q-tip and alcohol along the ionizing wires.
Repeat the above last 3 paragraphs if necessary.
Figure 9
Figure 10
Shake as much water out of the cell as possible.
Replace Cell in the unit as described below and oper-
ate unit in “FAN ONLY” position for a minimum of one
hour to insure cell is thoroughly dry.
TO CLEAN NEGATIVE
ION GENERATOR NEEDLE
Make sure the air cleaner is turned off and unplugged
from the electric power source for approximately 1
minute before cleaning needle.
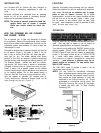
The negative ion generator needle is located in the
right rear of the air cleaner (Figure 11) and should be
cleaned at least every 60 days.
Simply use cotton swab dipped in alcohol and wipe off
the dirt from the needle. Using a dry cotton swab, make
sure the needle is dry.
Figure 11
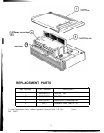
TO REPLACE ELECTRONIC COLLECTING
CELL AFTER CLEANING
NOTE: Use directions on top of Cell for proper place-
ment of the filters into the Cell and for replacing
the Cell into the unit. Unit will not operate
properly if the Cell is not replaced correctly.
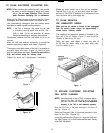
Slide the Pre-Filter in the slots provided in the front of
the Cell. (Figure 12)
Slide the Charcoal Filter in the slots provided in the
back of the Cell. (Figure 13)
Using the cell handles (Figure
14),
align the Cell with
the ribs (Figure 14) on the inside cabinet wall. Gently
slide Cell into place.
3