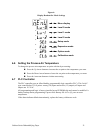
Cabinet Series Dehumidifying Dryer 29
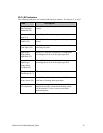
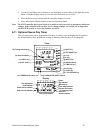
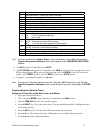
No. Function
1
Shifts the cursor (∇) specifying a day to the right.
2 Sets or cancels (reset) a specified day.
3, 4 Sets a time or ON/OFF time width. (hours, minutes)
5 Monitors the parameters set for an operation during an operation.
6 Sets parameters. (Write)
7 Sets a time adjustment mode.
8 Specifies a cyclic operation, or sets a pulse width. (Not used)
9 Specifies a day substitution operation. (Copy)
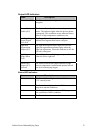
10 Cancels the parameters set for each circuit, or a day substitution operation.
11
P1: Circuit 1 programming mode.
P2: Circuit 2 programming mode.
Run: Run mode.
12
ON: Turns on the output regardless of the program
AUTO: Executes according to the program.
OFF: Turns off the output regardless of the program.
13
TIMER: Executes an ordinary timer or cyclic operation.
PULSE: Executes a pulse-output operation.
14 Specifies automatic or manual operation following a power failure.
15 The Output indicator will light when the timer output is energized. (Dryer On)
16 Displays the time at which the next operation will be preformed.
Note: For timer operation, the System Power rocker switch must be in the ON position and the
Dryer/on Sequence Shutdown rocker switch must be in the SEQUENCE SHUTDOWN
position.
• The OUT switch (#12) should be set to AUTO.
• The P1-P2 RUN mode switch (#11) should be set to RUN for normal 7-day timer operation, set to
P1 for changing times; P2 is not used. Open the front cover; the MODE switch (#13) must have
Mode 1 set to TIMER (up); 2 is not used, BOOT (#14) is set to AUTO (down).
• Program 1 is operational; Program 2 is not used.
Note: To bypass the 7-day timer operation, turn the 7-day timer OUT switch (#12) to off. Turn the
Dryer/On Sequence Shutdown rocker switch located on the dryer control panel to DRYER
ON.
Programming the Optional Timer
Setting the Current Day of the Week, Hour, and Minute
1. Apply main power to the dryer.
2. The 7-Day timer MODE selector switch (#11) should be in the RUN position.
3. Hold the TIME ADJ key (#7) for 1 second or longer.
4. Press the SHIFT key (#1) to move the cursor (∇) to the desired day position. Holding down this
key advances the day.
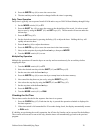
5. Press the SET key (#2). The bar mark will turn on under the chosen day.
6. Press the h key (#3) to adjust the hours. Holding the key will rapidly advance the hour.
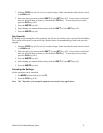
7. Press the m key (#4) to adjust the minutes.


