


10
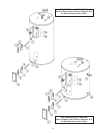
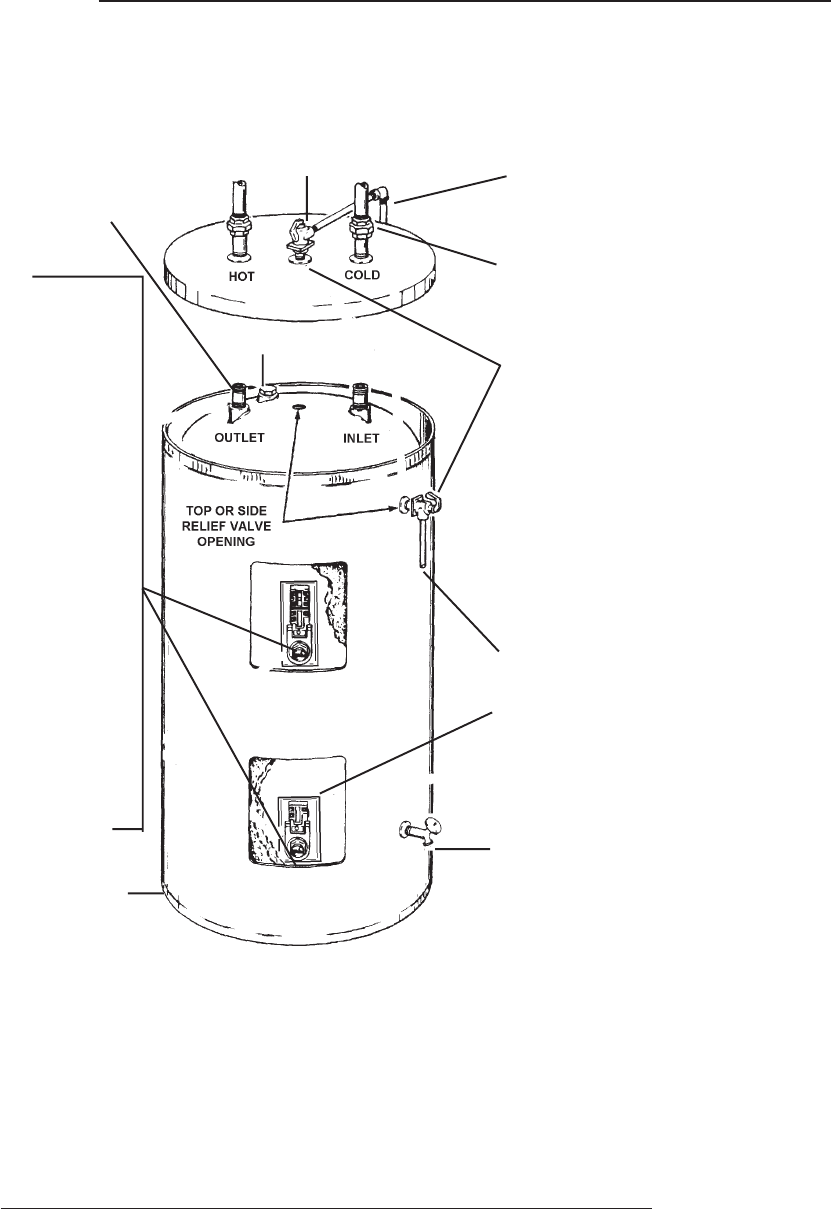
LEAKAGE CHECKPOINTS
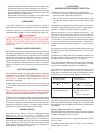
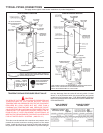
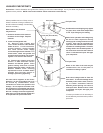
Instructions: Use this illustration as a guide when checking for sources of water leakage. You or your dealer may be able to correct what
appears to be a problem. NOTE: Cover and Insulation shown removed to reveal tank top
Relief Valve
To Open Drain
Condensation and dripping may appear
on pipes when cold water temperature
is low. Pipe fitting may be leaking.
Relief valve operation and leakage may
be due to water expansion during
heating cycle or foreign material on seat
of valve. If the valve is not piped to an
open drain the released water could be
mistaken for a leaking heater. Check for
leakage where the threaded portion of
the relief valve enters the tank. Remove
valve* if indicated and repair with pipe
joint compound.
Water on the side of the tank may be
condensation due to the panel or
insulation not being in place.
Drain valve leakage could be from the
valve itself.* To check for leakage where
threaded portion enters tank, insert Q-
tip or similar absorbent material
between jacket opening and valve to
swab spud area. Remove valve* if leak
is indicated and repair with pipe joint
compound.
*Contact your dealer as it is necessary to
shut off electricity and drain tank to perform
procedure.
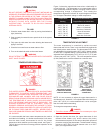
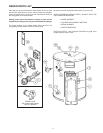
Water leaks at the elements
may be due to:
1. Defective element which leaks at
terminals or thru flange. Replace
element*.
2. Loose element/gasket leak:
(a) Screw-in type: tighten with
1-1/2” socket wrench or Part Number
23985 wrench. If leak continues,
remove element*, discard gasket
and clean thread areas. Apply
nonhardeningPermatex Number 2 to
thread areas, install new gasket and
screw element into fitting until it seats.
Tighten 1/2 to 3/4 turn with wrench.
(b) Flange type: tighten screw with
wrench. If leak continues remove
element* and discard gasket. Clean
gasket seating areas and re-install
element with new gasket. NOTE: Part
Number 40000-1 scale cleaning
replacement screws available where
threads have become rusted or
damaged, preventing tightening.
All water which appears at the heater
bottom or on the surrounding floor may
be caused by condensation, loose
connections or relief valve operation and
leakage. Do not replace the heater until
full inspection of all potential leak points
is made and corrective steps taken to stop
the leak. Leakage from other appliances,
water lines or ground seepage should also
be suspected until proven otherwise.
Anode Rod (Some Models)
Where possible remove or lift top cover to
examine threads of fittings installed into
tank for evidence of leakage. Correct fitting
leaks as necessary.
To Open Drain