


SpectraPure
SpectraPure®Inc.
480.894.5437 Call us toll-free 1.800.685.2783
2167 East Fifth St, Tempe, Arizona 85281
®
12
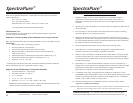
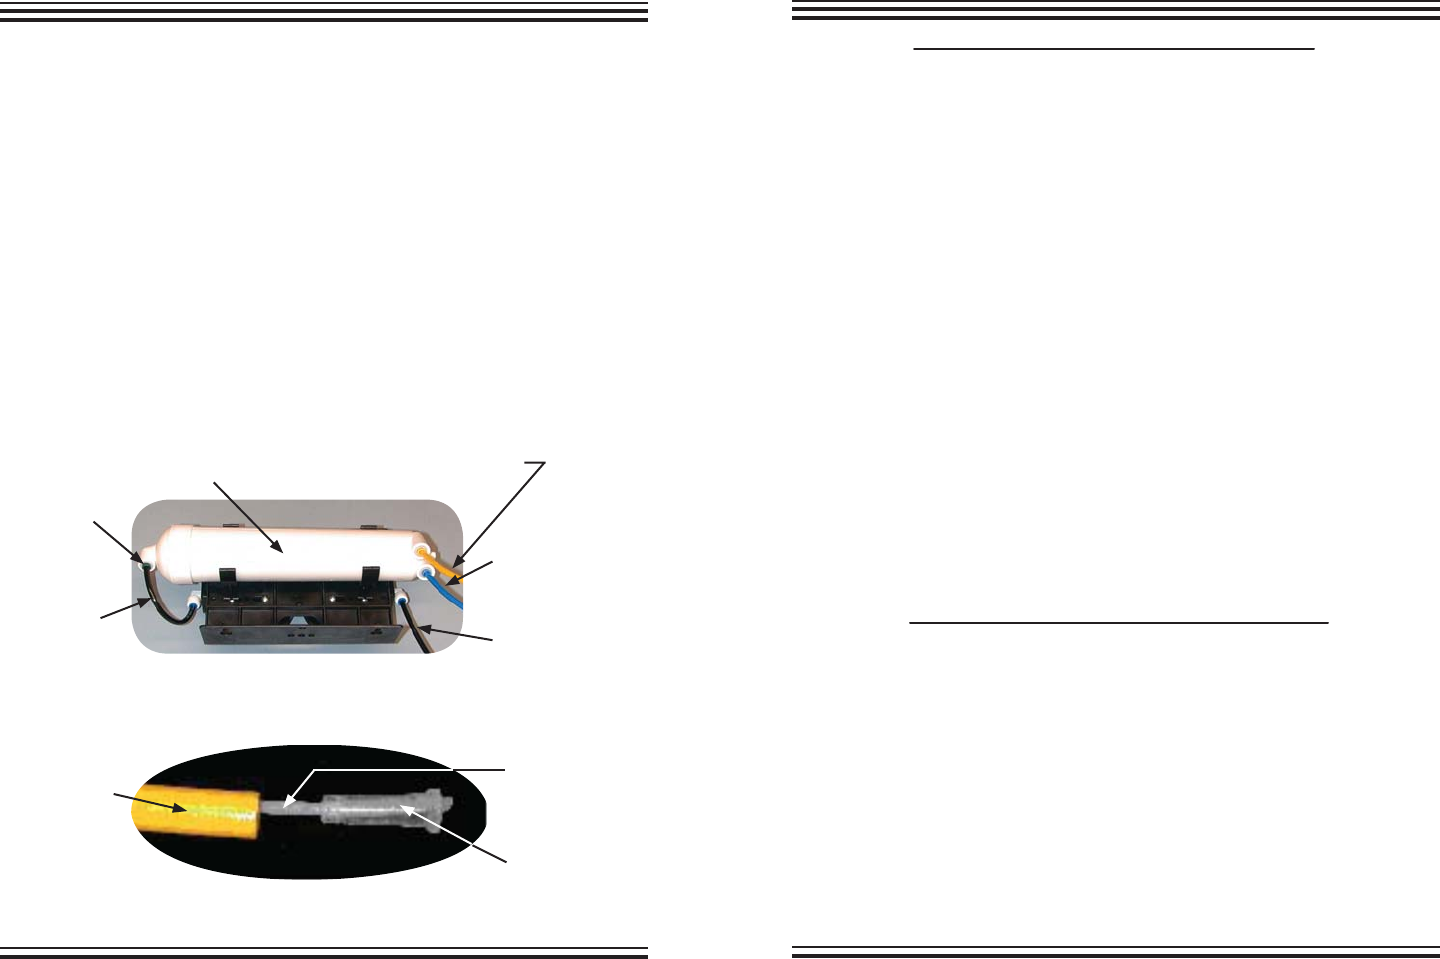
6. Re-insert the yellow tubing into its push-fitting in the RO membrane as
follows:
a.) Moisten the O-ring seal inside the concentrate outlet fitting by dripping
a few drops of clean water into the fitting.
b.) Grasp the yellow tubing near the flow restrictor end, and insert the
tubing into the push-fitting. Push the tubing into the fitting until
resistance is felt, approximately 1/2 inch (12.7 mm). The tubing is now
resting on the O-ring seal inside the fitting.
c.) Firmly push the tubing approximately an additional 1/4 inch
(6.35 mm) further into the fitting to completely seat the line into
the fitting and O-ring seal.
7. Turn on the system water supply and check for leaks prior to further use or
testing. If a leak is observed, you may not have pushed the yellow tubing
into the push-fitting far enough to seal the tubing against the O-ring. Turn
off the system water supply and reseat the tubing as described above.
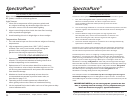
yellow tubing
capillary tubing
plastic insert
Fig. D: Flow Restrictor Assembly
Fig. C: Reverse Osmosis Assembly
Top/Rear View
membrane
feed
push-fitting
black
tubing to
membrane
feed
RO membrane
yellow concentrate tubing
blue purified water
tubing
black feed water
tubing
(Waste Water)
(Good Water)
(Tap Water)
SpectraPure®Inc
. Fax 480.894.6109 Fax us toll-free 1.877.527.7873
E-mail: spectra@spectrapure.com Visit us on the web www.spectrapure.com
13
SpectraPure
®
SEDIMENT PRE-FILTER REPLACEMENT
For maximum contaminant removal and long membrane life, the sediment
pre-filter must be changed when a 15-20% drop in pressure is observed OR at
least 6-month intervals. If your water contains a great deal of sediment the
pre-filter may require more frequent changes to maintain adequate production
rate and extended membrane life.
Sediment Pre-Filter Replacement
Materials Required: 0.5-micron MicroTec™ Sediment Filter (SF-MT-0.5-10),
Filter Wrench
Procedure: (FIRST FILTER ON LEFT)
1. Turn off water supply to the system.
2. Refer to photo on page 6. Using the provided filter wrench, remove
the first housing on the left. Unscrew it counterclockwise as viewed
from the bottom.
3. Remove the old filter and discard.
4. Thoroughly wash the housing with a mixture of hot soapy water and a
few teaspoons of household bleach. Rinse well with clean hot water.
5. Install the new pre-filter into the housing,
Screw the housing back onto the
assembly, and hand tighten only.
NOTE: Do not use filter wrench to tighten housings. Over-tightening will
damage housings and void your warranty.
6. Proceed with carbon block filter replacement.
CARBON BLOCK FILTER REPLACEMENT
For maximum contaminant removal and long membrane life, the carbon
pre-filter must be changed at least ever 6-month or when chlorine breakthrough
greater than 0.1 ppm occurs in the yellow concentrate line. Test for chlorine
breakthrough by collecting a 10 ml sample of the concentrate from the yellow
tubing and test the chlorine concentration using test kit TK-CL-10. If the chlorine
concentration is above 0.1ppm, replace the carbon pre-filter.
Materials Required: 0.5 micron Carbon Block Filter (CF-0.5-10), Filter Wrench,
Chlorine Test Kit (TK-CL-10)
Procedure: (SECOND FILTER ON LEFT WHEN FACING SYSTEM)
1. Perform steps 1-5 listed above
2. Turn on system water supply and check for leaks.