


5
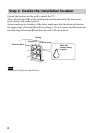
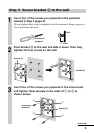
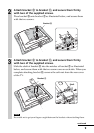
Step 3: Secure bracket A to the wall
1
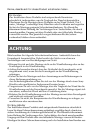
Insert four of the screws you prepared at the positions
marked in Step 2 (page 4).
Do not tighten the screws completely for the moment. Keep a space of
2 to 3 mm from the wall.
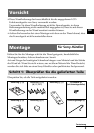
2
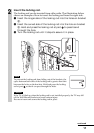
Press bracket A to the wall and slide it down. Then fully
tighten the four screws on the wall.
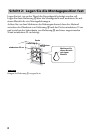
3
Insert four of the screws you prepared in the screw holes,
and tighten them securely in the order of 1 to 4 as
shown below.
Screws you
prepared
Wall
2 - 3 mm
,
Wall
Bracket A
Wall
Bracket A
continued
Screws you
prepared
Bracket A
1
3
2
4