INSTALLATION & ASSEMBLY INSTRUCTIONS - WINDOW MOUNTING
REMOVE CHASSIS
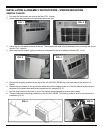
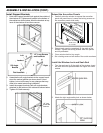
1. Pull down the front panel and remove the filter (FIG. 1 below)
2. Lift the front panel upwards to remove and place to the side.
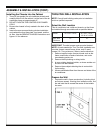
3. Locate the four faceplate screws and remove. These screws will need to be re-installed prior to mounting the air con-
ditioner (FIG. 2 above)
4. After removing the screws, gently pull away the faceplate from the air conditioner cabinet (FIG. 3 & 4).
5. Remove the shipping screws from the top of the unit (SG-WAC-25ESE only) and both sides of the cabinet if in-
stalled.
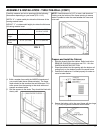
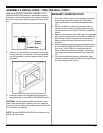
6. Remove the two screws on the top of the chassis that hold the cabinet to the unit. Hold the cabinet while pulling on
the base of the chassis and remove the chassis from the cabinet (FIG. 5).
7. Add two foam inserts to the holes on top of the cabinet where the shipping screws were located.
8. There may be internal packing protection on the SG-WAC-25ESE. This packing material must be removed prior to
installation (FIG. 6)
7
FIG. 2
FIG. 1
FIG. 3 FIG. 4
FIG. 6
FIG. 5


